Trying out some more heat-set insert timfoolery.
Uncategorized
20
Posts
1
Posters
14
Views
-
Trying out some more heat-set insert timfoolery. This is the first time I've tried it with the lightweight Pinecil soldering iron - doing it by hand, I can get way better results with that than with my old, big, heavy iron, and these should be good enough for small project mounts.
Still think it'll be worth building a parallelogram jig for doing lots of them accurately at once, but with okay results by hand I can push on with the retro PC case this week. #3DPrinting
And this is how I'm doing it - that's a specially shaped tip on the end for making contact with inserts and pushing them in flat. You *can* do this with a regular soldering iron, but you need to design your part to have enough space behind the insert for the rest of the soldering tip to go in without contacting plastic.
-
And this is how I'm doing it - that's a specially shaped tip on the end for making contact with inserts and pushing them in flat. You *can* do this with a regular soldering iron, but you need to design your part to have enough space behind the insert for the rest of the soldering tip to go in without contacting plastic.
Check out this absolutely cursed hinge idea I had - two parts, each with two threaded inserts, and a grub screw bolting them together through the middle.
This was the worst of both worlds for a hinge - finnicky enough that only one of them worked because of slightly misaligned inserts, and it has enough play in it that it's as bad as the worst hinge I tried with a real ball bearing.
Don't get me wrong, it does work as a hinge - but it's not reliable to make, and not very precise. #3DPrinting
-
Check out this absolutely cursed hinge idea I had - two parts, each with two threaded inserts, and a grub screw bolting them together through the middle.
This was the worst of both worlds for a hinge - finnicky enough that only one of them worked because of slightly misaligned inserts, and it has enough play in it that it's as bad as the worst hinge I tried with a real ball bearing.
Don't get me wrong, it does work as a hinge - but it's not reliable to make, and not very precise. #3DPrinting
I actually think that if I had been more precise in adding the threaded inserts, it'd be wobblier as a hinge - the free play in the mechanism I think comes from the fact that cheap M3 screws and threads are not precision parts, so having better aligned inserts would actually give it more room to move.
I wonder now if just hammering a steel pin through matching holes in printed parts wouldn't make for an okay hinge. Or pressing a chicago screw in and working the joint until it loosened.
-
I actually think that if I had been more precise in adding the threaded inserts, it'd be wobblier as a hinge - the free play in the mechanism I think comes from the fact that cheap M3 screws and threads are not precision parts, so having better aligned inserts would actually give it more room to move.
I wonder now if just hammering a steel pin through matching holes in printed parts wouldn't make for an okay hinge. Or pressing a chicago screw in and working the joint until it loosened.
Once again, having an accurate, reliable 3D printer disperses another iota of the scarcity mindset complex.
Or: Look! When you print vertical holes with a 5.25mm inner diameter, they perfectly fit a 5mm chicago screw - and you can use this fact to build up a long flexible chain of parts.
It's not my beloved plasbeams, but I guess a more lightweight system is better for a lightweight soldering iron.
Time to expand this out to longer beams and see how it goes.
-
Once again, having an accurate, reliable 3D printer disperses another iota of the scarcity mindset complex.
Or: Look! When you print vertical holes with a 5.25mm inner diameter, they perfectly fit a 5mm chicago screw - and you can use this fact to build up a long flexible chain of parts.
It's not my beloved plasbeams, but I guess a more lightweight system is better for a lightweight soldering iron.
Time to expand this out to longer beams and see how it goes.
The principle I'm working with here is that opposite sides of a parallelogram are always held parallel, no matter what the internal angles are, so if you build a series of them locked together, you get a machine that extends and moves freely in two dimensions, but always keeps the end exactly parallel with the start - which is exactly what you'd want from a wall- or stand-mounted mechanism for holding a soldering iron perfectly level.
I have more chicago screws and washers coming. #3DPrinting
-
The principle I'm working with here is that opposite sides of a parallelogram are always held parallel, no matter what the internal angles are, so if you build a series of them locked together, you get a machine that extends and moves freely in two dimensions, but always keeps the end exactly parallel with the start - which is exactly what you'd want from a wall- or stand-mounted mechanism for holding a soldering iron perfectly level.
I have more chicago screws and washers coming. #3DPrinting
This is not permanent as I don't have long enough screws to hold it together, but this is already an unexpectedly pleasing object to handle. These beams have a 1x1cm cross-section and are absolutely rigid enough to keep the far ends parallel no matter what. This feels like the kind of thing you'd find in a classroom to demonstrate how geometry works.
-
This is not permanent as I don't have long enough screws to hold it together, but this is already an unexpectedly pleasing object to handle. These beams have a 1x1cm cross-section and are absolutely rigid enough to keep the far ends parallel no matter what. This feels like the kind of thing you'd find in a classroom to demonstrate how geometry works.
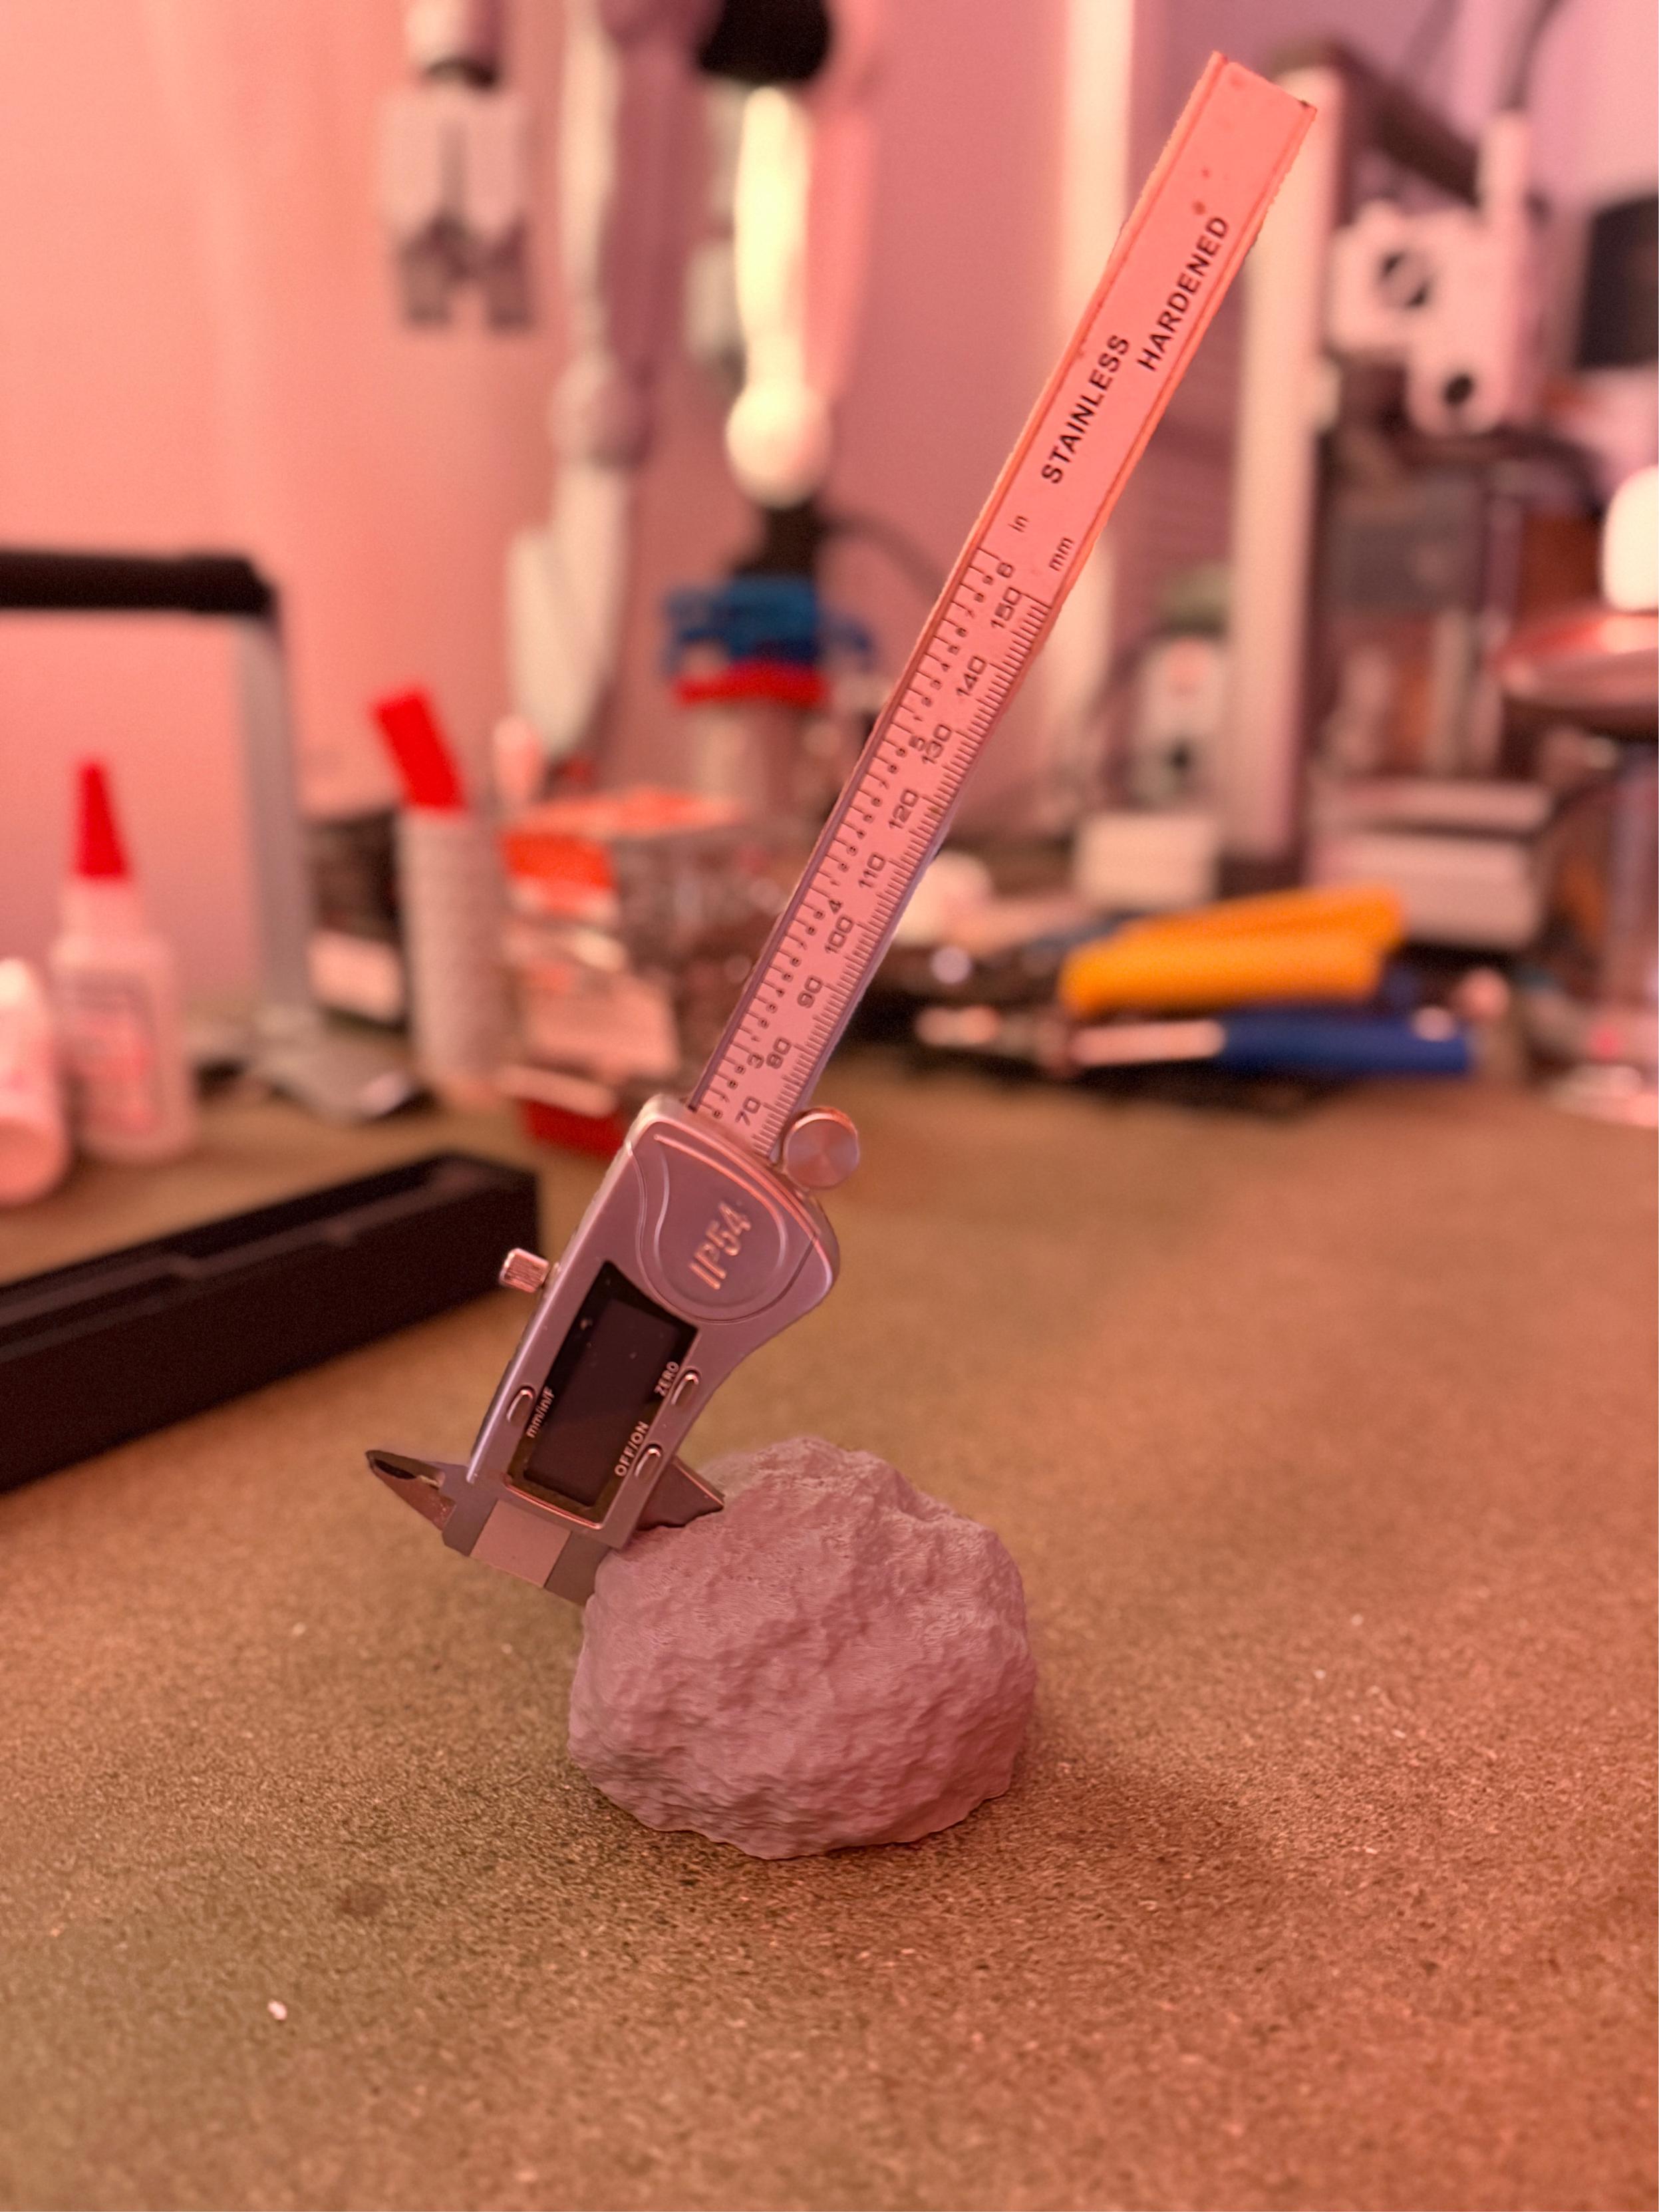
Modelling something in 3D is such a simple joy for me. It's the ultimate mastery of computing - to perfectly reproduce a physical object in the virtual world. This is the reason I own a quality digital caliper.
This is an accurate 3D model of the soldering iron I plan to use in my threaded insert jig. I could've just made this a couple of dull rectangular blocks, but this will help me orient and scale an actual thing within the space of a project, not just line up some dots and tick a box. #CAD
-
Modelling something in 3D is such a simple joy for me. It's the ultimate mastery of computing - to perfectly reproduce a physical object in the virtual world. This is the reason I own a quality digital caliper.
This is an accurate 3D model of the soldering iron I plan to use in my threaded insert jig. I could've just made this a couple of dull rectangular blocks, but this will help me orient and scale an actual thing within the space of a project, not just line up some dots and tick a box. #CAD
Five iterations later, here's my mount for a Pinecil soldering iron.
The iron slots securely in place and is held by pressure on its rubber grip. Future cable management will stop it falling if it manages to wiggle out. It'll be mounted to the carriage by two M3 screws, so people with different irons can still use this system. Those screw mounts are chamfered, so it's self-centring and self-leveling on the carriage. And an inset arrow printed in a different colour makes the orientation obvious.
-
Five iterations later, here's my mount for a Pinecil soldering iron.
The iron slots securely in place and is held by pressure on its rubber grip. Future cable management will stop it falling if it manages to wiggle out. It'll be mounted to the carriage by two M3 screws, so people with different irons can still use this system. Those screw mounts are chamfered, so it's self-centring and self-leveling on the carriage. And an inset arrow printed in a different colour makes the orientation obvious.
The soldering iron mount being held by two screws also means it'll be trivial to undo the top screw and swivel the mount so it's being held at an angle. That won't be useful for pressing threaded inserts into prints, but someone requested that as an accessibility feature to make actual regular soldering easier - this whole arrangement will make holding and manoeuvring the iron take much less force and energy.
The model below is just a quick sketch of that to get a feel for proportions.
-
The soldering iron mount being held by two screws also means it'll be trivial to undo the top screw and swivel the mount so it's being held at an angle. That won't be useful for pressing threaded inserts into prints, but someone requested that as an accessibility feature to make actual regular soldering easier - this whole arrangement will make holding and manoeuvring the iron take much less force and energy.
The model below is just a quick sketch of that to get a feel for proportions.
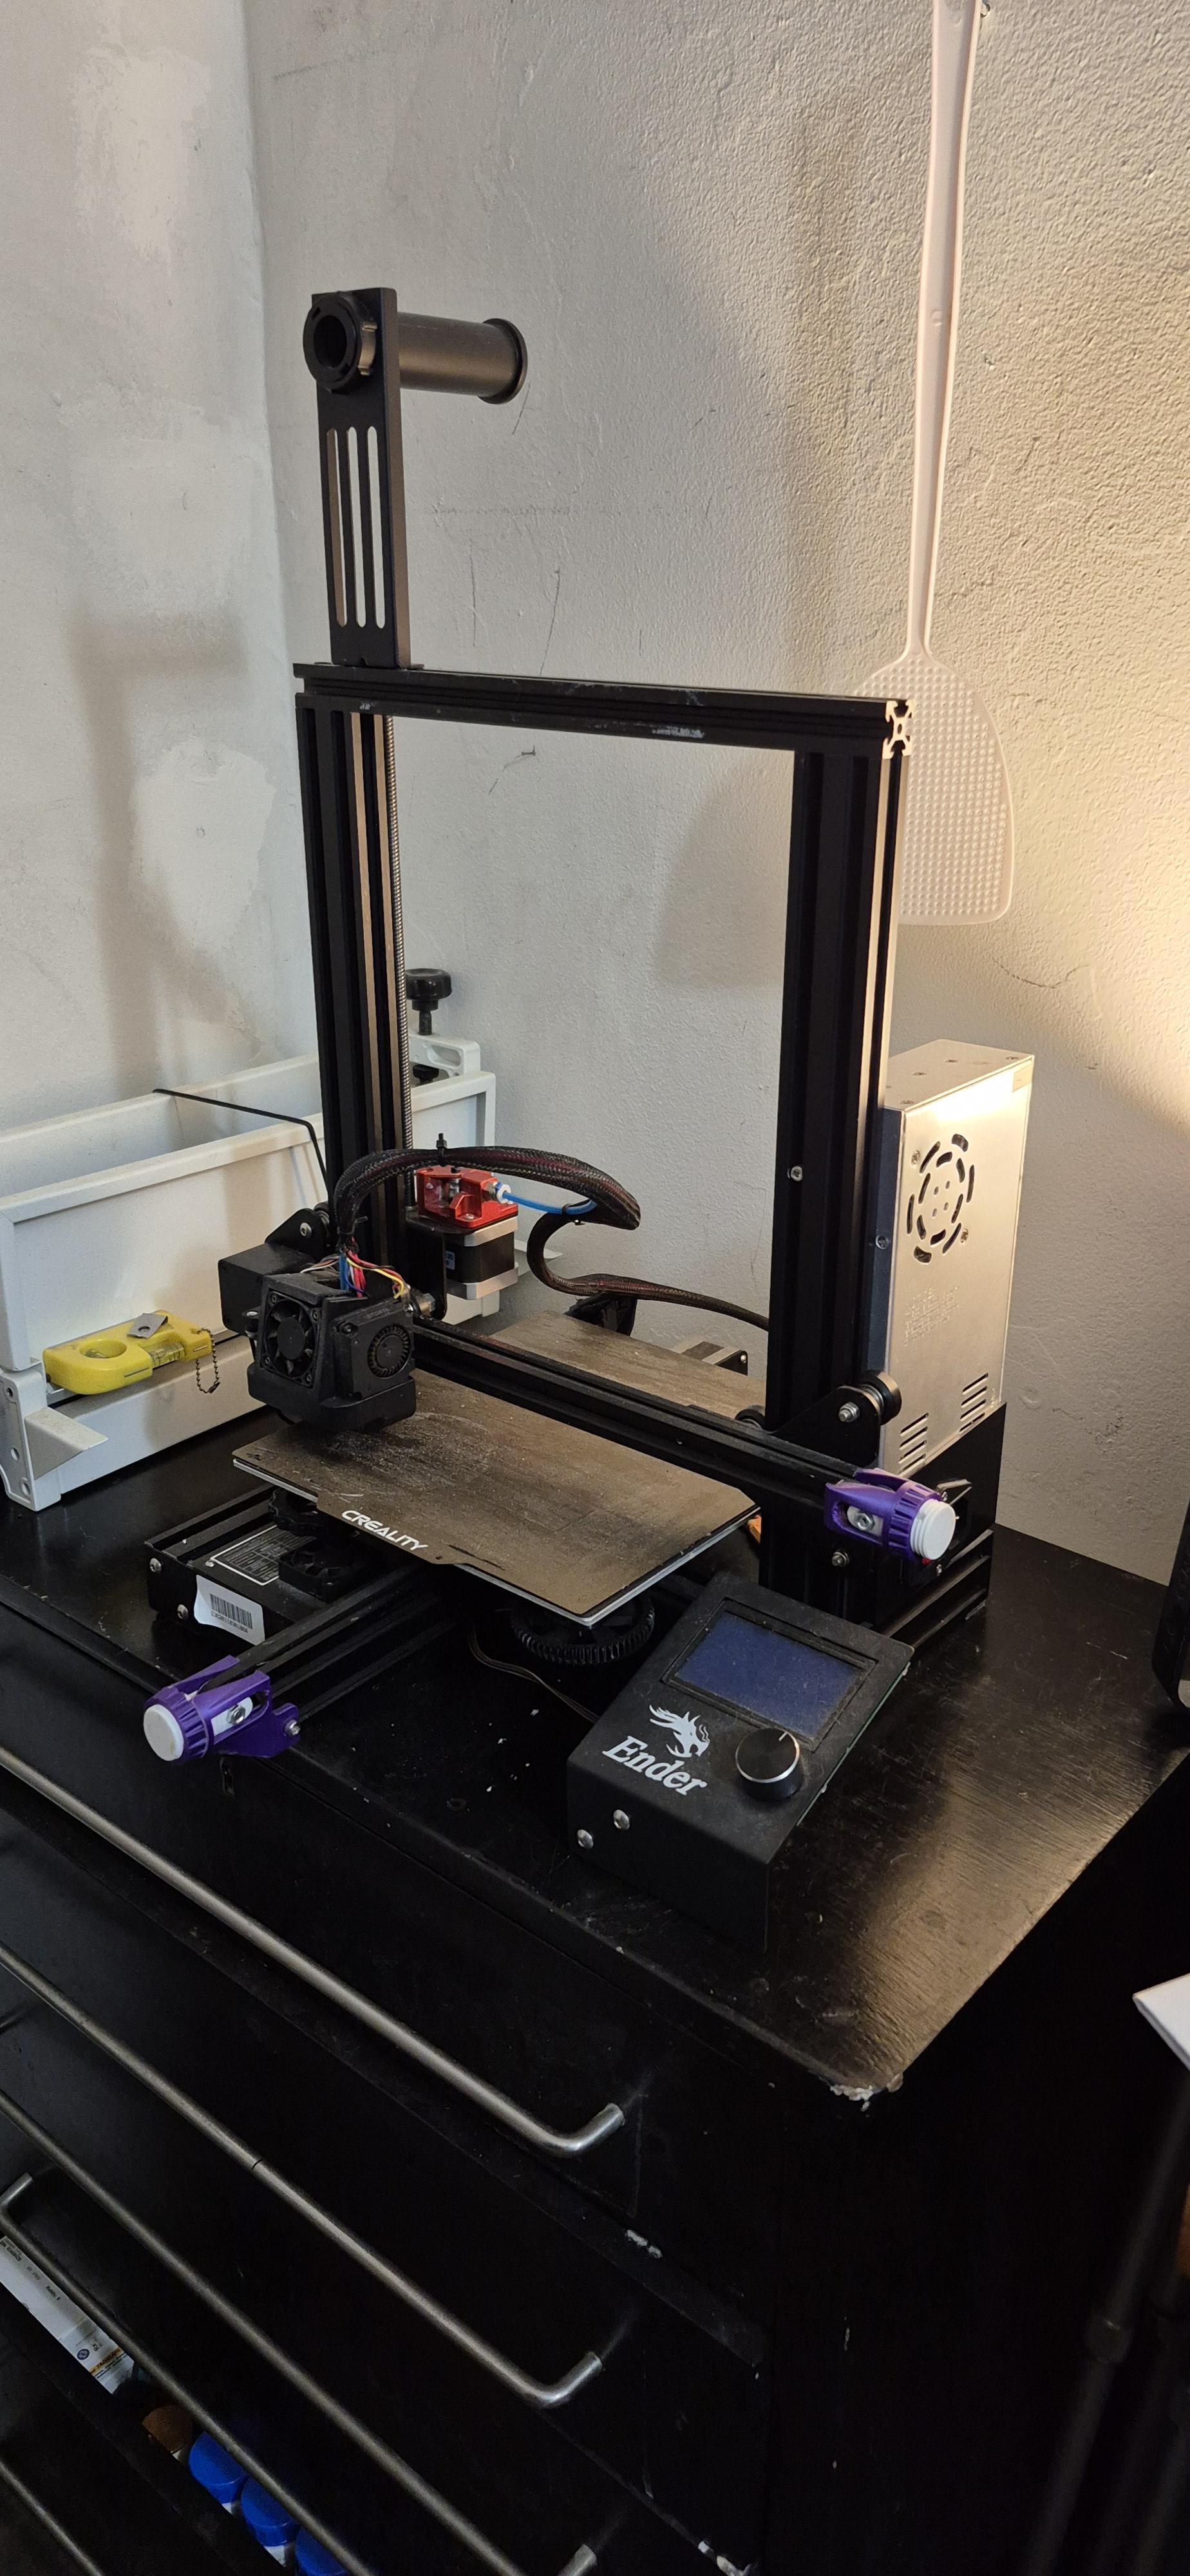
The 3D printed soldering iron mount in prototype form. This camera stand is too high for its current length, it was just a convenient way to attach it to my desk.
It turns out chicago screws are a great way to make a hinge for a 3D print. This thing moves around naturally with almost no resistance at all, and once I get the proper length screws and washers involved this should be a very long-lasting mechanism. #3DPrinting
-
The 3D printed soldering iron mount in prototype form. This camera stand is too high for its current length, it was just a convenient way to attach it to my desk.
It turns out chicago screws are a great way to make a hinge for a 3D print. This thing moves around naturally with almost no resistance at all, and once I get the proper length screws and washers involved this should be a very long-lasting mechanism. #3DPrinting
Getting very close to a v1.0 of the heat-set insert jig. It's now properly mounted on a plasbeam base and proportioned neatly for the $20 IKEA Komplement shelf it sits on.
It's light enough to hold itself in place when you let go but I'll be adding some kind of safety clip to hold it upright when it's parked.
That Pinecil just friction fits in the holder (scroll up for that detail) and it can be modified for other soldering irons.
-
Getting very close to a v1.0 of the heat-set insert jig. It's now properly mounted on a plasbeam base and proportioned neatly for the $20 IKEA Komplement shelf it sits on.
It's light enough to hold itself in place when you let go but I'll be adding some kind of safety clip to hold it upright when it's parked.
That Pinecil just friction fits in the holder (scroll up for that detail) and it can be modified for other soldering irons.
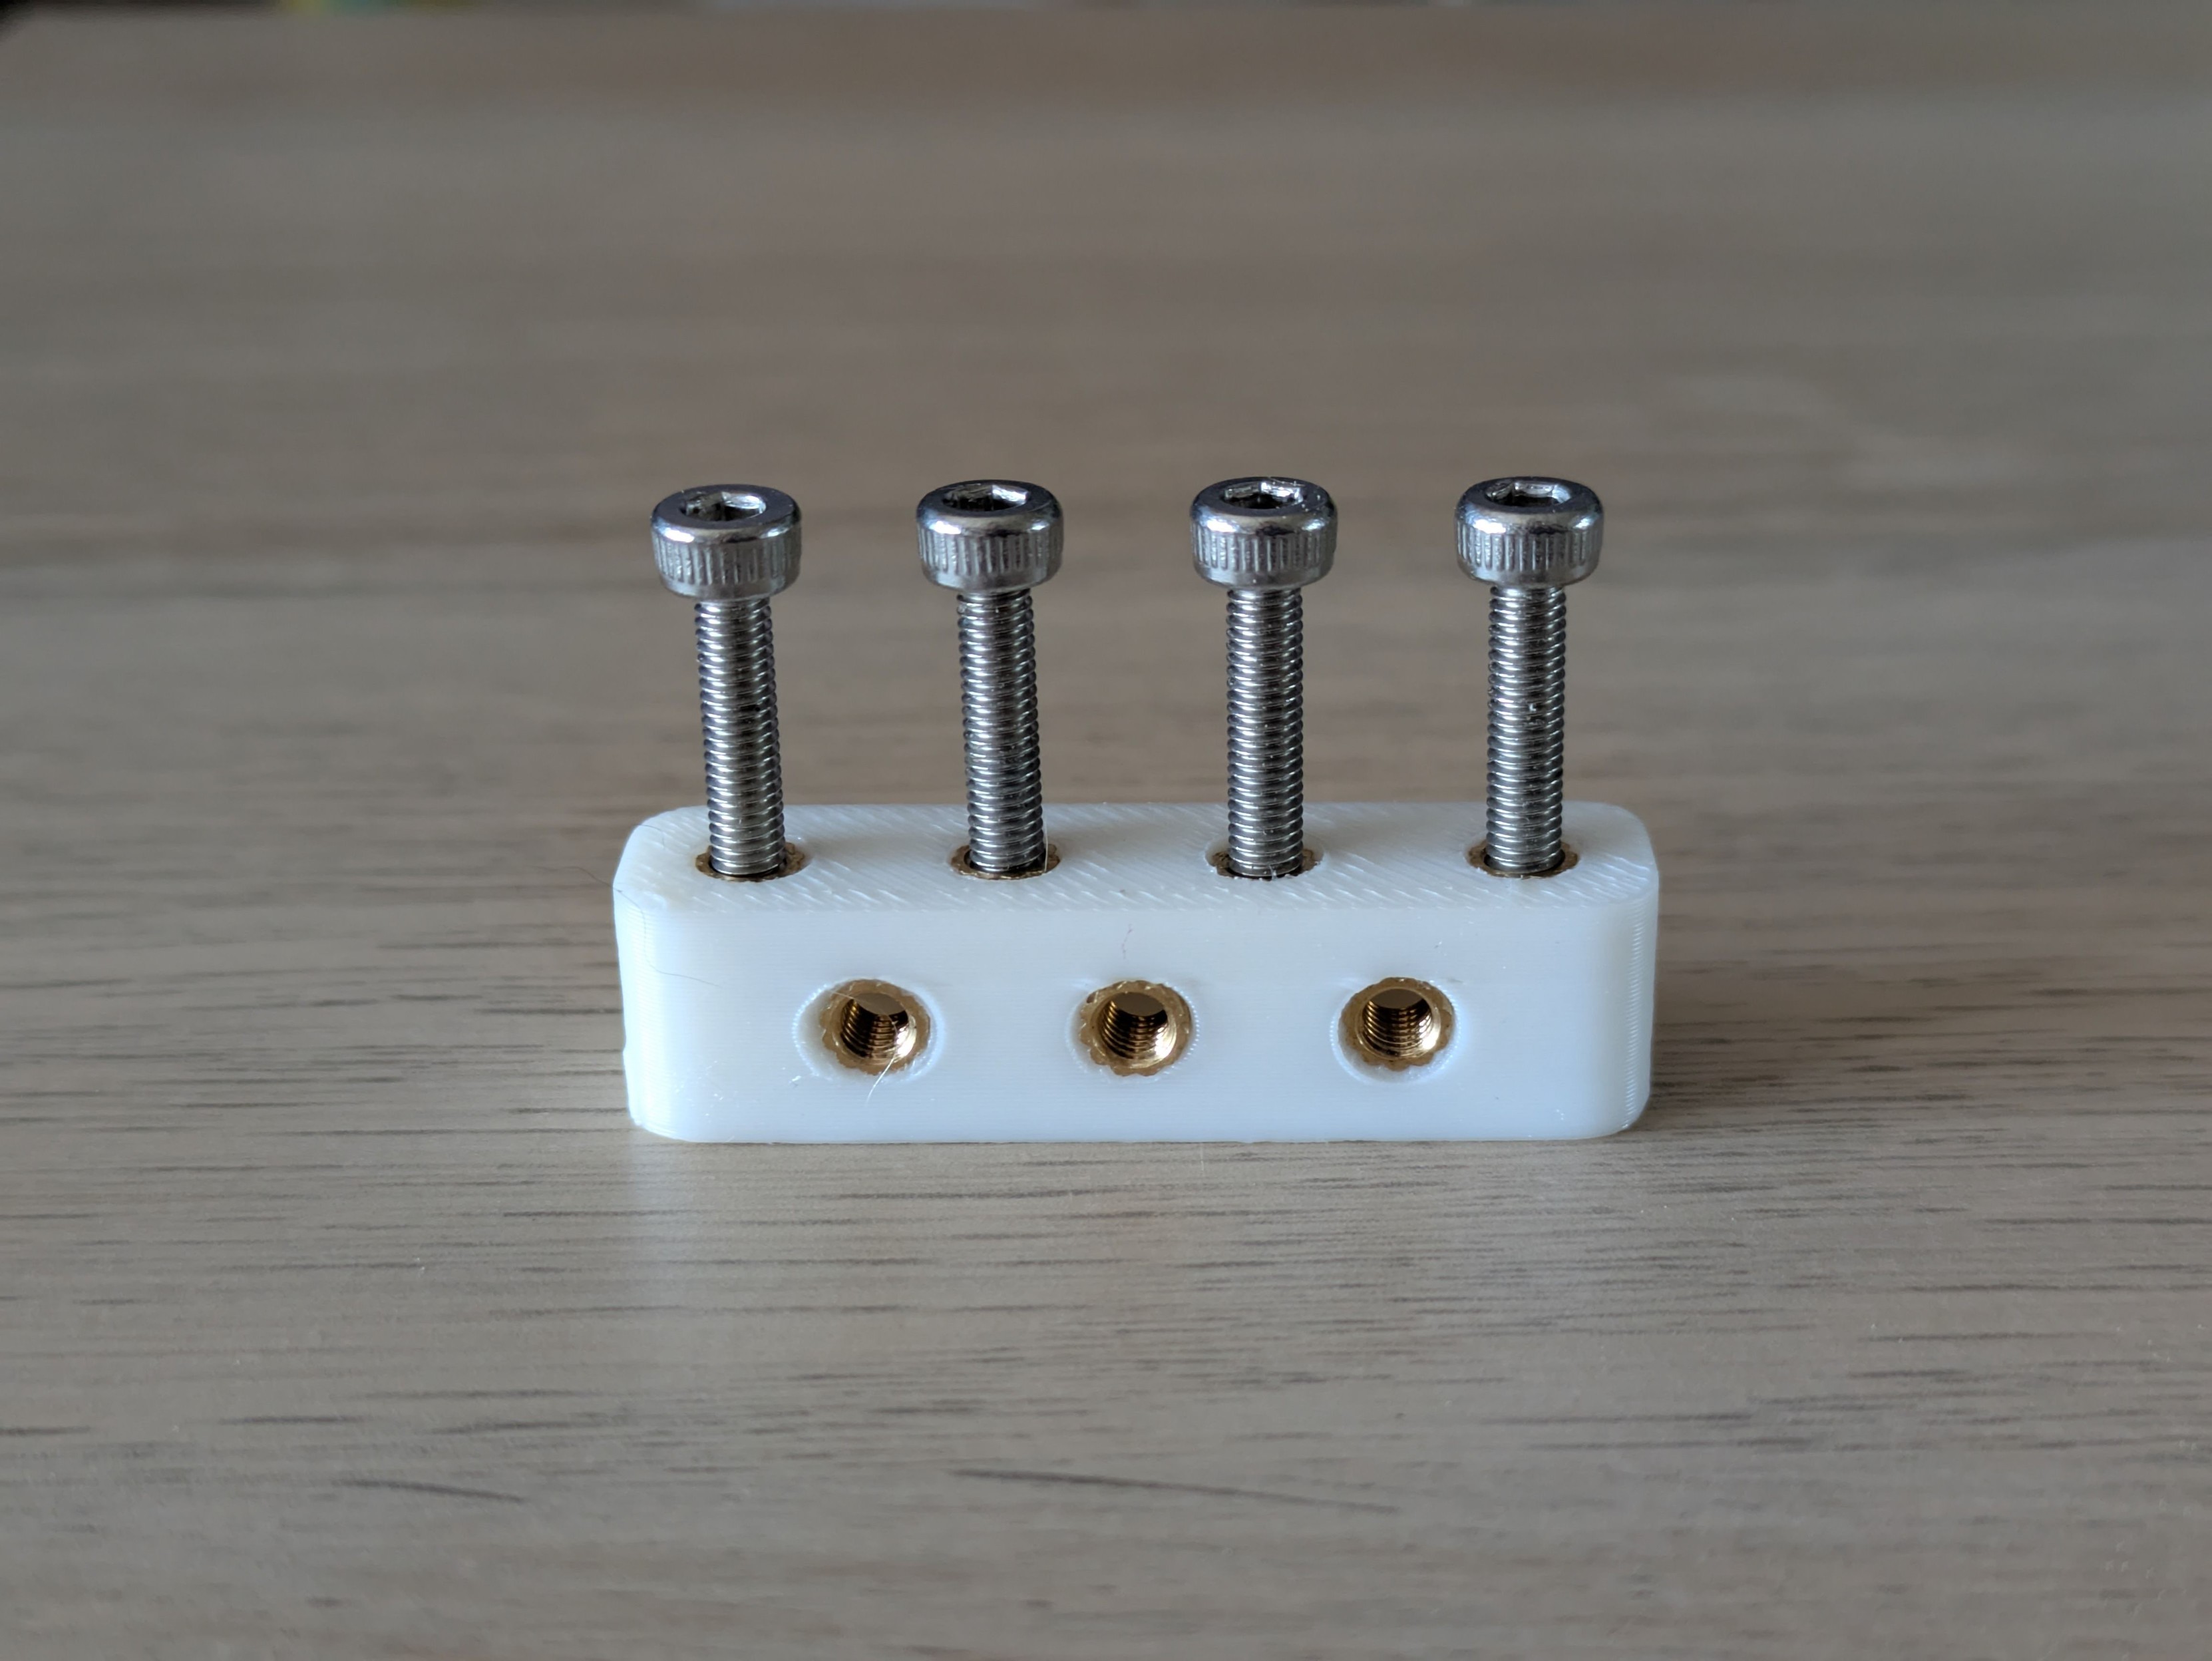
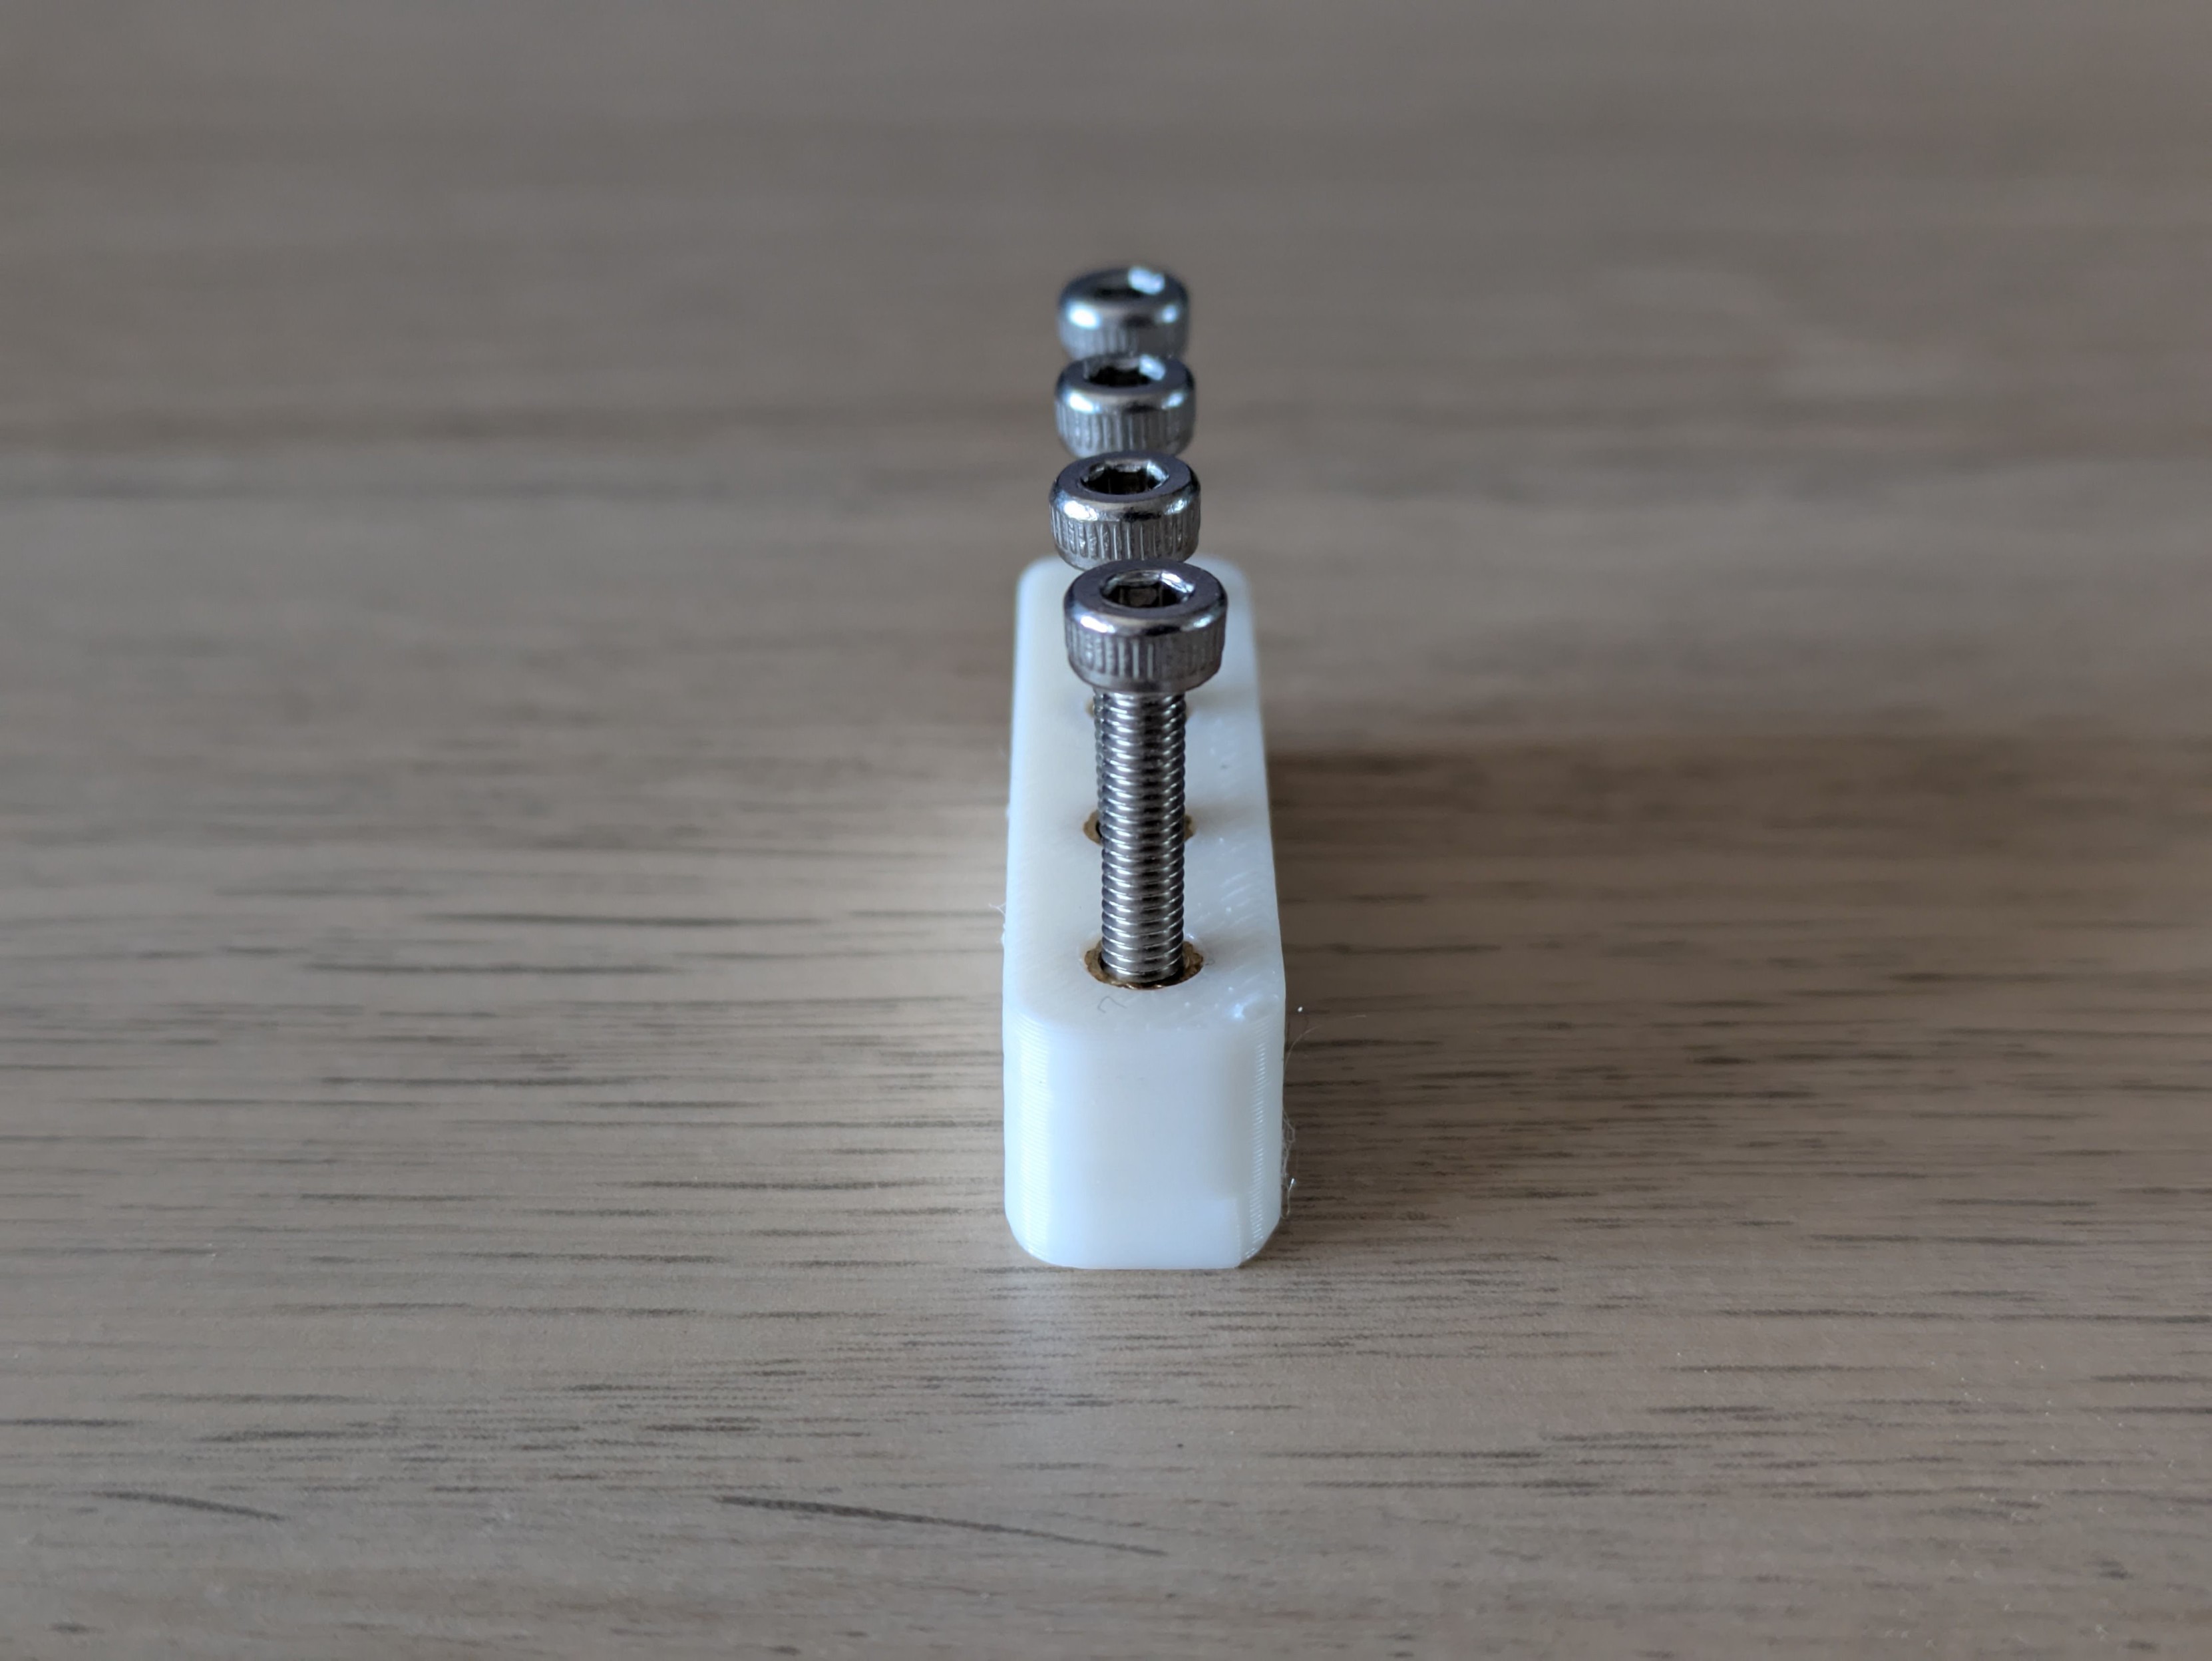
Left: The most accurately I could install threaded heat-set inserts freehand a couple of weeks ago. Right: What they look like when pressed into place using my parallelogram jig. I think the results speak for themselves.
You don't need to buy an expensive kit with heavy metal parts to accurately use heat-set inserts. Just some 3D printed bits and bobs that don't even need inserts to assemble - just screws.
If anyone in Australia thinks they'd like a kit of this thing, let me know.
-
Left: The most accurately I could install threaded heat-set inserts freehand a couple of weeks ago. Right: What they look like when pressed into place using my parallelogram jig. I think the results speak for themselves.
You don't need to buy an expensive kit with heavy metal parts to accurately use heat-set inserts. Just some 3D printed bits and bobs that don't even need inserts to assemble - just screws.
If anyone in Australia thinks they'd like a kit of this thing, let me know.
And here's the angled soldering iron mount - it can be set to zero, 15, 30 or 45 degrees, and every hole goes right through so the mount can be used right- or left-handed in exactly the same way. Haven't tried using this yet but I'll build the next NES adapter with it.
Folks with an interest in #accessibility - what could I do to make this more useful/versatile? It already holds the soldering iron exactly wherever you move it in space but there'll be further improvements I can't fathom myself.
-
And here's the angled soldering iron mount - it can be set to zero, 15, 30 or 45 degrees, and every hole goes right through so the mount can be used right- or left-handed in exactly the same way. Haven't tried using this yet but I'll build the next NES adapter with it.
Folks with an interest in #accessibility - what could I do to make this more useful/versatile? It already holds the soldering iron exactly wherever you move it in space but there'll be further improvements I can't fathom myself.
Cable management - to keep the soldering iron's power cord safely out of the way. Here it's a little loose, but that's because the model was made for my bigger wall-plug soldering iron's cord - a USB-C-powered one will need tighter tolerances.
That said, those two blue bits were originally on my V1 mount built entirely from plasbeams - so that system being as versatile and universal as possible is already paying off, even in development.
-
Cable management - to keep the soldering iron's power cord safely out of the way. Here it's a little loose, but that's because the model was made for my bigger wall-plug soldering iron's cord - a USB-C-powered one will need tighter tolerances.
That said, those two blue bits were originally on my V1 mount built entirely from plasbeams - so that system being as versatile and universal as possible is already paying off, even in development.
Ok, that's *almost* a whole NES adapter soldered together using a soldering iron in the para jig. It's not my best ever soldering job, and I had to go free-hand to join the two boards together (as the pins are very close to the plastic NES sockets), but overall that was at least as quick as doing it totally free-hand, and often easier (especially with the workpiece actually held in place).
The missing cut-off pins on top are an oversight of my order-of-operations and my 3D printed assembly jig.
-
Ok, that's *almost* a whole NES adapter soldered together using a soldering iron in the para jig. It's not my best ever soldering job, and I had to go free-hand to join the two boards together (as the pins are very close to the plastic NES sockets), but overall that was at least as quick as doing it totally free-hand, and often easier (especially with the workpiece actually held in place).
The missing cut-off pins on top are an oversight of my order-of-operations and my 3D printed assembly jig.
For plain through-hole soldering on a not-too-complicated board held in place on a flat surface, this thing would genuinely make it easier for *me*, nevermind someone who might otherwise have trouble holding a soldering iron. The jig takes away a surprising amount of brain noise about keeping the thing steady and safely out of the way when not actually doing the thing.
A second tower with some kind of solder-feeding stick would make it a very efficient task. Like having steady robot hands.
-
For plain through-hole soldering on a not-too-complicated board held in place on a flat surface, this thing would genuinely make it easier for *me*, nevermind someone who might otherwise have trouble holding a soldering iron. The jig takes away a surprising amount of brain noise about keeping the thing steady and safely out of the way when not actually doing the thing.
A second tower with some kind of solder-feeding stick would make it a very efficient task. Like having steady robot hands.
Actually, is that a thing that exists? Like a mechanical pencil but for solder, so I can evenly feed it into a workpiece without putting my fingers near The Danger Zone? Bonus points if it's also USB powered and I can hold down a button to make a little gear whirr it out. Searching for "solder pump" gets me a lot of those desoldering suction things.
At least one other person has had this idea: https://www.reddit.com/r/mechanicalpencils/comments/1e630j5/solder_pen/
-
Actually, is that a thing that exists? Like a mechanical pencil but for solder, so I can evenly feed it into a workpiece without putting my fingers near The Danger Zone? Bonus points if it's also USB powered and I can hold down a button to make a little gear whirr it out. Searching for "solder pump" gets me a lot of those desoldering suction things.
At least one other person has had this idea: https://www.reddit.com/r/mechanicalpencils/comments/1e630j5/solder_pen/
Looks like it's entirely possible to literally just load up a mechanical pencil with lengths of solder: https://www.instructables.com/Mechanical-Pencil-Solder-Loader/
Ideally I'd want something with a little continuous servo that rolled it in and out on demand at the push of a button, but I don't think I have time to design and build that at the moment.
-
 undefined oblomov@sociale.network shared this topic on
-
Looks like it's entirely possible to literally just load up a mechanical pencil with lengths of solder: https://www.instructables.com/Mechanical-Pencil-Solder-Loader/
Ideally I'd want something with a little continuous servo that rolled it in and out on demand at the push of a button, but I don't think I have time to design and build that at the moment.
A small but significant update to my heat-set insert press jig today, inspired by the parallelogram arm Marius Hornberger built to support his CNC machine's control panel.
Offsetting the link mounts allow the mechanism to fold flat - not only does this look neater, it will also make it trivial to design a magnet clip to safely lock the thing up and out of the way when not in use.
Obvious in hindsight but not something I came up with - this is why I watch all kinds of #maker videos. #3DPrinting
Gli ultimi otto messaggi ricevuti dalla Federazione
-
Current* conditions near Alpena, MI:
-
Big deal, so do I
-
@GiorgiaMecojoni @politica @informapirata
Vi piace vincere facile con lo #stabilicum??
Ma come fate a garantire la stesss maggioranza al senato e alla camera?
https://www.youtube.com/live/HKqDi-E9Fdw?si=FN4xPOojktnse_M3
-
@ed questo mi sa che non lo seguo. L'ho già visto e per quanto non mi sia dispiaciuto non ho nemmeno 'sta gran voglia di rivederlo (peraltro visto anche di recente).
Buona visione!
-
Current* conditions near Alexandria Bay, NY:
-
Inauguriamo la rubrica #laScuolaDimenticata #nonPiuScuola con un articoletto sulla #provaDelNove
https://wok.oblomov.eu/mathesis/prova-del-nove/
Menzione speciale alla #provaDellUndici che piace tanto a @mau
-
@cm that too
-
@afreytes Or did you just have it all in your head and just needed to type it now, while you spent your morning thinking about the problem at hand, searching reference docs, etc?