My #LT6502 is assembled.
Uncategorized
34
Posts
14
Posters
20
Views


-
What would I do differently?
1) Start the design with the keybed, it's a bit squeezed in (I'm not happy with the placement of a few keys).
2) spend longer sourcing a thinner battery (this is 3x18650s)
3) Use an FFC for the display (this would make the display portion about 10mm thinner straight away!)
4) Reduce the smaller fiddly bits in the case, a lot of the problems I had were down to me trying to print things with 0.1mm resolution.
5) Add more clips for the case so it doesn't gape in places@PaulaMaddox How did you solve the hinges?
Are them sturdy enough?
-
Well depends on what kind of look you're after. Some people like that sanded look.
But now that you've said it is PLA, there may be an easier solution. Curing. I haven't tried it myself but others have suggested it to me in the past, take a big bag of salt (or sand), dump it into a container with your 3D print berried in the middle not touching any of the corners and bring it up to the melting point and let it set again. Basically you're making a mould and casting it all at once
And for the hinge have a look at how e.g. nintendo did it on their DS consoles. Basically use these yellow kind of cables and then curl it up and shove it through a hinge with a hole in the center. (But as I said it is quite annoying to work with and assuming you want to take it apart a few times again your solution is probably better suited anyway)
https://www.ifixit.com/Guide/Nintendo+DSi+XL+Hinges+Replacement/3573
-
@PaulaMaddox How did you solve the hinges?
Are them sturdy enough?
@ekaitz_zarraga They're actually really sturdy, I took the idea from here - https://www.printables.com/model/658393-friction-hinge-mechanism/comments#preview.file.aPNjd
You can adjust the stiffness easily.
They won't last forever like metal hinges, but I couldn't find any available to buy. -
And for the hinge have a look at how e.g. nintendo did it on their DS consoles. Basically use these yellow kind of cables and then curl it up and shove it through a hinge with a hole in the center. (But as I said it is quite annoying to work with and assuming you want to take it apart a few times again your solution is probably better suited anyway)
https://www.ifixit.com/Guide/Nintendo+DSi+XL+Hinges+Replacement/3573
@agowa338 I remember fixing laptops with that sort of thing, so easy to break and a pain to work on as you say.
I will think of something for the next version :) -
@PixRetro It's the Bambu translucent red.
@PaulaMaddox thanks! I'll have to give it a go! 😁
-
@agowa338 I remember fixing laptops with that sort of thing, so easy to break and a pain to work on as you say.
I will think of something for the next version :)Well I feel like your solution is good enough. How hard is it to replace that ribbon cable in your build? when you really damage it?
From the pictures not at all. At most I'd focus on making it replaceable without opening the entire case but that's basically it.However keep cooking your stuff looks great :)
-
Well I feel like your solution is good enough. How hard is it to replace that ribbon cable in your build? when you really damage it?
From the pictures not at all. At most I'd focus on making it replaceable without opening the entire case but that's basically it.However keep cooking your stuff looks great :)
@agowa338 it's fairly simple to replace, maybe takes 5 minutes.
-
@ekaitz_zarraga They're actually really sturdy, I took the idea from here - https://www.printables.com/model/658393-friction-hinge-mechanism/comments#preview.file.aPNjd
You can adjust the stiffness easily.
They won't last forever like metal hinges, but I couldn't find any available to buy.@PaulaMaddox Oh I see! Very cool! thanks for sharing
-
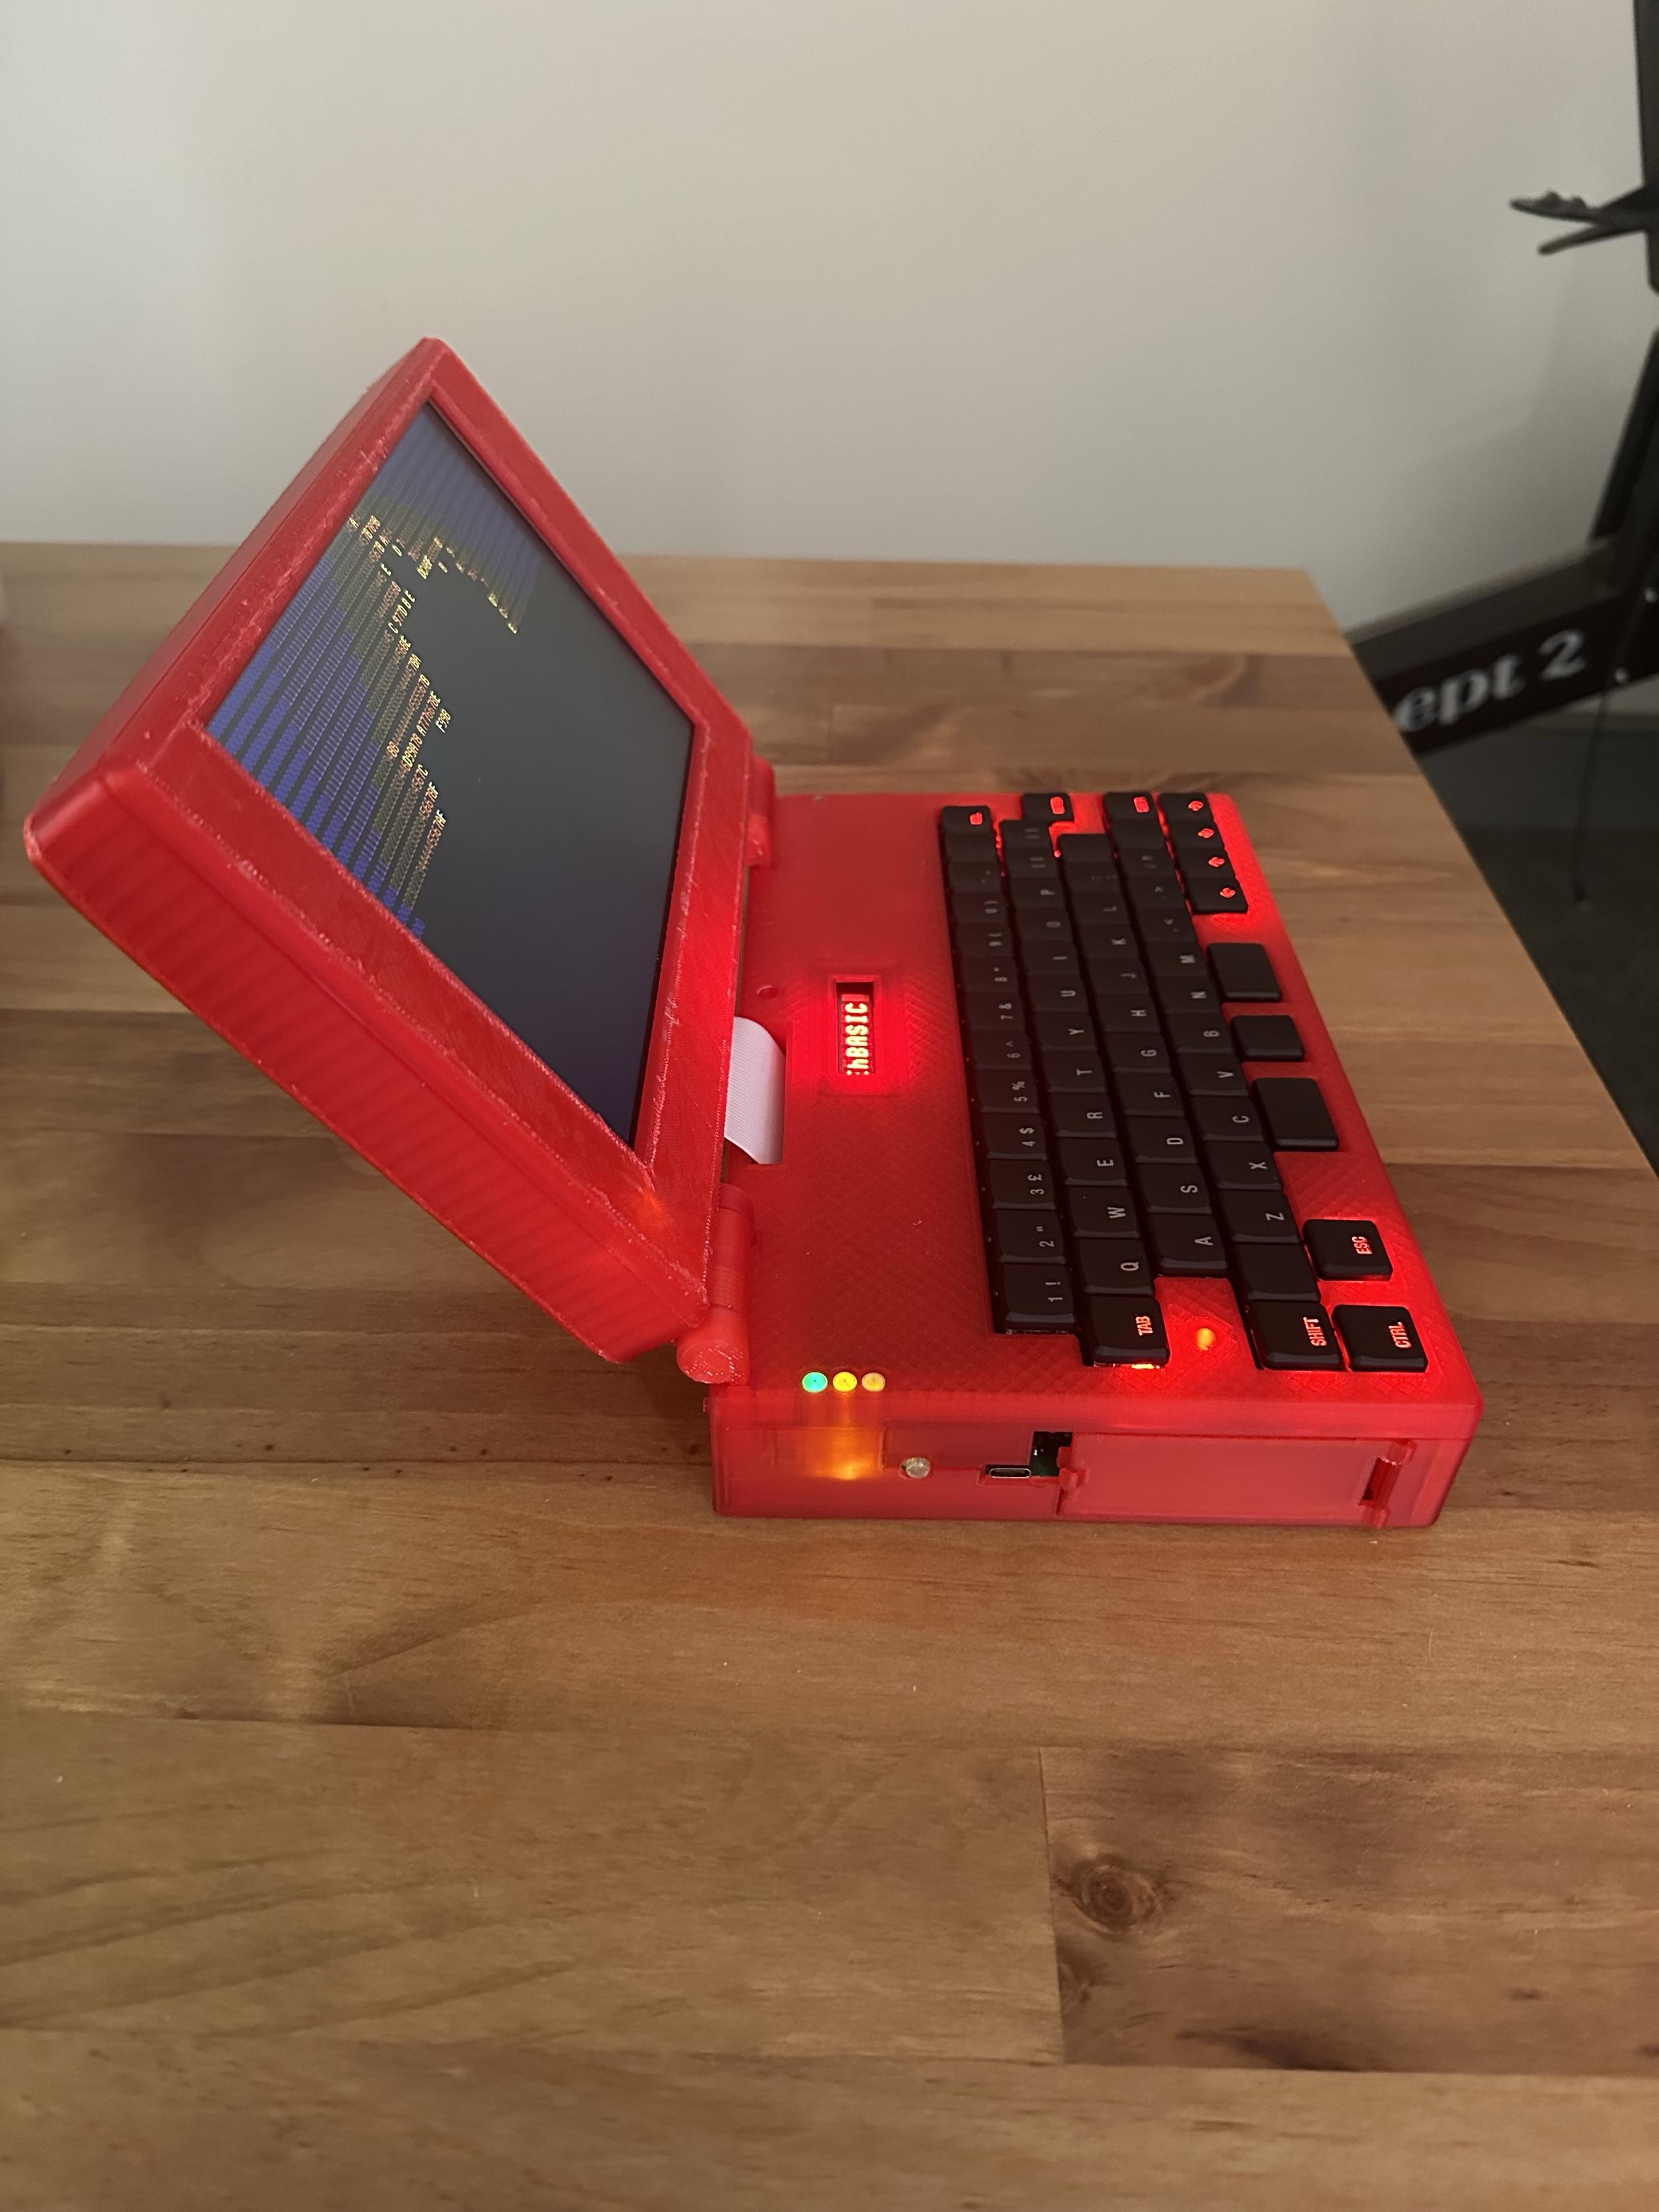
My #LT6502 is assembled.
The hinges work really well, if a tad fiddly to get right.
The case, well there are a few gaps here and there, this could be improved with more clips.
Also I’ve learned a lot about 3D printing and there is a lot I would change.
But overall, I’m happy with it.
It’s a bit of a chonker but that honestly doesn’t bother me.
#retrocomputing@PaulaMaddox This is awesome!
-
My #LT6502 is assembled.
The hinges work really well, if a tad fiddly to get right.
The case, well there are a few gaps here and there, this could be improved with more clips.
Also I’ve learned a lot about 3D printing and there is a lot I would change.
But overall, I’m happy with it.
It’s a bit of a chonker but that honestly doesn’t bother me.
#retrocomputing -
My #LT6502 is assembled.
The hinges work really well, if a tad fiddly to get right.
The case, well there are a few gaps here and there, this could be improved with more clips.
Also I’ve learned a lot about 3D printing and there is a lot I would change.
But overall, I’m happy with it.
It’s a bit of a chonker but that honestly doesn’t bother me.
#retrocomputing@PaulaMaddox So cool, nice job! And thanks for the link to the friction hinge
-
@PaulaMaddox So cool, nice job! And thanks for the link to the friction hinge
@BetaRayBiff Credit where credit is due, not my idea, I just implemented it :)
-
What would I do differently?
1) Start the design with the keybed, it's a bit squeezed in (I'm not happy with the placement of a few keys).
2) spend longer sourcing a thinner battery (this is 3x18650s)
3) Use an FFC for the display (this would make the display portion about 10mm thinner straight away!)
4) Reduce the smaller fiddly bits in the case, a lot of the problems I had were down to me trying to print things with 0.1mm resolution.
5) Add more clips for the case so it doesn't gape in places@PaulaMaddox Looks really great! I’ve been pondering a battery system based on replaceable Nokia phone batteries; might not provide enough power though.
-
@PaulaMaddox Looks really great! I’ve been pondering a battery system based on replaceable Nokia phone batteries; might not provide enough power though.
@M0CUV to be honest, I've no idea how long this lasts.
I should probably test it somehow.... -
My #LT6502 is assembled.
The hinges work really well, if a tad fiddly to get right.
The case, well there are a few gaps here and there, this could be improved with more clips.
Also I’ve learned a lot about 3D printing and there is a lot I would change.
But overall, I’m happy with it.
It’s a bit of a chonker but that honestly doesn’t bother me.
#retrocomputing@PaulaMaddox
An absolute triumph. Would love to see this being exhibited at an event. -
@PaulaMaddox
An absolute triumph. Would love to see this being exhibited at an event.@electron_greg Thank you, I will do a video.
Not sure if I can get to an event, possibly #Retrofest in Swindon (UK). -
My #LT6502 is assembled.
The hinges work really well, if a tad fiddly to get right.
The case, well there are a few gaps here and there, this could be improved with more clips.
Also I’ve learned a lot about 3D printing and there is a lot I would change.
But overall, I’m happy with it.
It’s a bit of a chonker but that honestly doesn’t bother me.
#retrocomputing -
My #LT6502 is assembled.
The hinges work really well, if a tad fiddly to get right.
The case, well there are a few gaps here and there, this could be improved with more clips.
Also I’ve learned a lot about 3D printing and there is a lot I would change.
But overall, I’m happy with it.
It’s a bit of a chonker but that honestly doesn’t bother me.
#retrocomputing@PaulaMaddox As someone not into retrocomputers: 😍😍
-
@electron_greg Thank you, I will do a video.
Not sure if I can get to an event, possibly #Retrofest in Swindon (UK).@PaulaMaddox
That'd be amazing if you could. I'm there. -
My #LT6502 is assembled.
The hinges work really well, if a tad fiddly to get right.
The case, well there are a few gaps here and there, this could be improved with more clips.
Also I’ve learned a lot about 3D printing and there is a lot I would change.
But overall, I’m happy with it.
It’s a bit of a chonker but that honestly doesn’t bother me.
#retrocomputing@PaulaMaddox so cool 🤩 ! what type of screen did you use?
Feed RSS
Gli ultimi otto messaggi ricevuti dalla Federazione
-
-
@evan These people complaining how they can’t keep any water at their bedsides because cat either haven’t discovered bottles or have super advanced cats with opposable thumbs.
-
@evan I used to, but I also have my desktop computer next to my bed, because it was the only realistic way to lay things out. And after an accident which cost me $2000 in computer parts, I decided I could go downstairs if I was thirsty in the middle of the night.
-
@evan
I only keep a glass, and It's totally full, but mostly not water or any such substance.
-
@evan Yes indeed. Middle of the night thirst quench is one of life’s little pleasures.
-
@evan Thanks, I saw the warning first and will heed it 😅
-
@evan I actually have to now, because I have to take medicine *right when I wake up*. Which is annoying as hell if I don't have water to take the pill with right next to me.
-
@evan I try to --but at least once a week some cat liberates it and I end up with water all over the floor.