Rabbit character as part of a series I'm working on, drawn while on Blakely Island.
Uncategorized
54
Posts
1
Posters
8
Views

-
Froufrou rabbit's covered in little nubby clusters of fur.
Drip rabbit is in need of a pick-me-up.
-
Drip rabbit is in need of a pick-me-up.
Seems like Piwi rabbit's got something to say...?
-
Seems like Piwi rabbit's got something to say...?
Grem rabbit says what Piwi could not.
-
Grem rabbit says what Piwi could not.
Awestruck Shallot rabbit.
Hard not to laugh while drawing this one ^^
-
 undefined Oblomov shared this topic on
-
Awestruck Shallot rabbit.
Hard not to laugh while drawing this one ^^
Chaotic Tangle rabbit.
-
Chaotic Tangle rabbit.
Estelle rabbit, trying to communicate with Moo, a rabbit spirit that likes to wander through tall grass.
-
Estelle rabbit, trying to communicate with Moo, a rabbit spirit that likes to wander through tall grass.
Smitten Pollen rabbit.
-
Smitten Pollen rabbit.
Memo rabbit.
-
Memo rabbit.
Fiver rabbit makes 50! 🎉
-
Fiver rabbit makes 50! 🎉
Pepper rabbit, too grey today, can’t process the drawing properly yet so sharing a photo~!
-
Pepper rabbit, too grey today, can’t process the drawing properly yet so sharing a photo~!
Sy rabbit siiiiiiiigh
-
Sy rabbit siiiiiiiigh
-
After a brief Rabbit hiatus, I am back!
Here is #54: Semaphore Arthur.
-
After a brief Rabbit hiatus, I am back!
Here is #54: Semaphore Arthur.
Loose-skinned Spaghetti rabbit.
Gli ultimi otto messaggi ricevuti dalla Federazione
-
@Uilebheist ma nemmeno lo fa in allegria
-
A 19 anni ero convinto che di lì a poco sarei partito per un tour mondiale con la mia band hard rock.
A 24 rispondevo alle chiamate in un call centre.
Wat de fak is andato storto in quei fatidici 5 anni?
-
-
Viaggiatori, è quasi tutto pronto per il mio viaggio a La Gomera (isole Canarie).
Durante il viaggio cercherò di postare foto e pensieri, si Pixelfed, e sul neonato gruppo "Viaggi e Foto" su #Feddit (https://www.feddit.it/c/viaggi).
Ogni giorno scriverò qualcosa, Nun mini blog del giorno, anche sulla sezione dedicata del mio sito:
https://simoneviaggiatore.wordpress.com/la-gomera/
Restiamo in contatto! 🙂
-
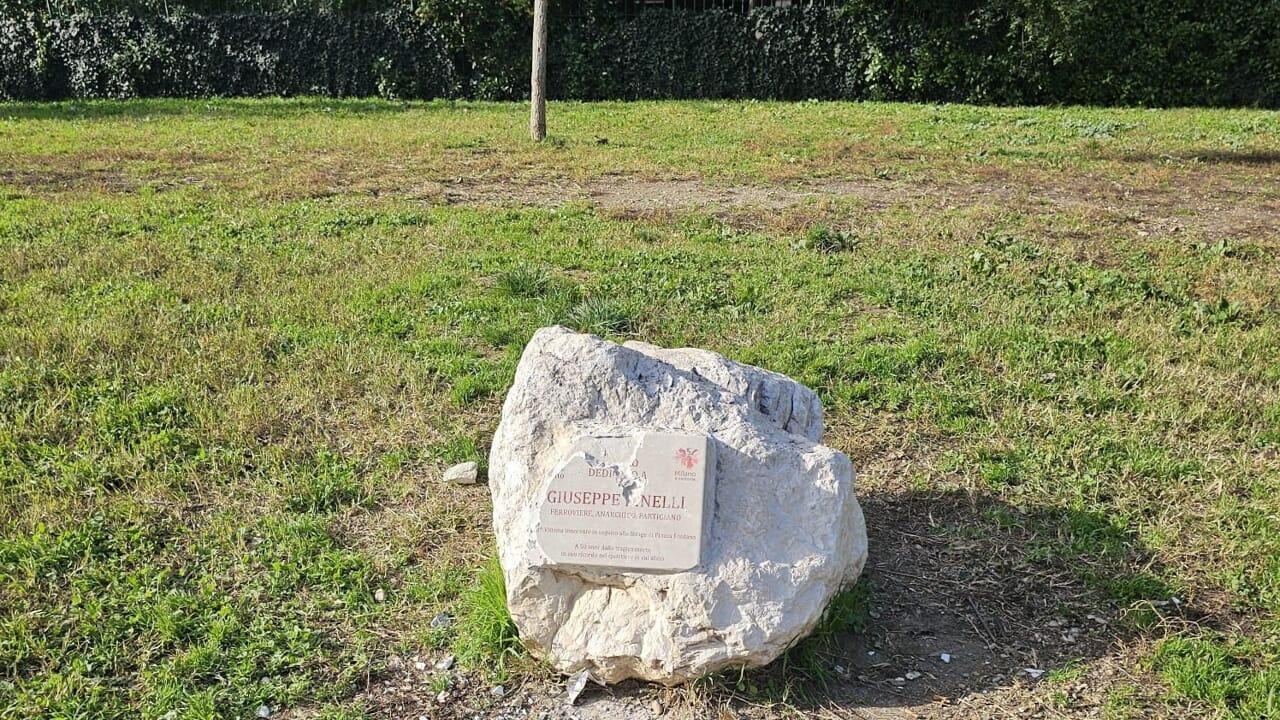
La targa per Giuseppe Pinelli è stata vandalizzata per la sesta volta
È stata vandalizzata per la sesta volta la targa in ricordo di Giuseppe Pinelli, ferroviere e attivista anarchico morto il 15 dicembre 1969 nei locali della questura di Milano. La targa è posizionata in piazzale Segesta, a San Siro, non lontano dalla sua abitazione.
da https://www.milanotoday.it/politica/vandalizzata-targa-pinelli-ottobre-2025.html
Aggiungo un'altra foto, che nell'articolo non compare, di un cartello apparso questa estate "tra una vandalizzazione e l'altra" che riporto testualmente:
"Giuseppe Pinelli: assassinato e vilipeso. Il Cippo in Piazzale Segesta, in memoria di Giuseppe Pinelli, partigiano-ferroviere-anarchico, ancora una volta è stato vandalizzato per mano della topaia fascista, avvalendosi delle coperture del governo di destra.
Un governo che vuole riscrivere la storia e che utilizza il Decreto "Insicurezza" per reprimere le lotte rivendicative di lavoratori, studenti e movimenti vari.
Una legge bocciata anche dalla Corte di Cassazione, ma l'attuale governo, come già nel ventennio fascista, risponde: "Ce ne freghiamo".
-
I made a couple of points where #Linux excels over #Windows
https://youtu.be/pkvTIrKRLas
-
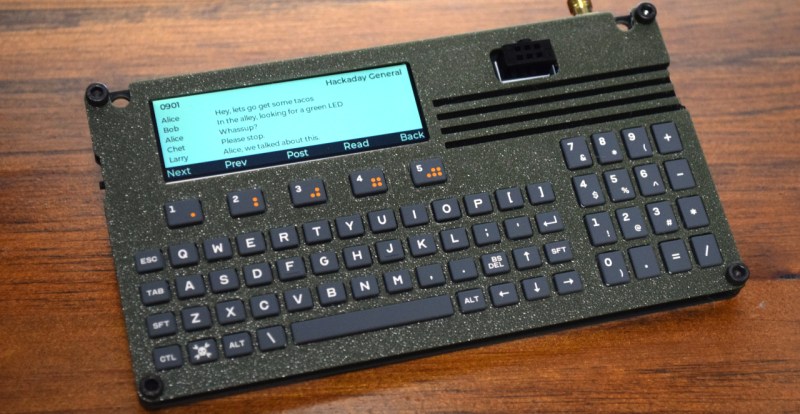
The Supercon 2025 Badge is Built to be Customized
For anyone who’s joined us for previous years, you’ll know that badge hacking and modification are core to the Hackaday Supercon experience. While you’re of course free to leave the badge completely stock, we encourage attendees to tear it apart, learn how it works, and (hopefully) rebuild it into something unique. There are even prizes for the best hacks.
As such, every decision about the badge’s hardware and software is made with hackability in mind. It’s why we always try to add an expansion port to the badge and, in recent years, have leaned into MicroPython to make it easier for attendees to modify the code.
But one thing that’s been largely missing in previous badges is aesthetic customization. Sure, you could strip out the firmware and write something entirely new, or hang some oddball peripheral off the side of the thing, but ultimately it still looked like the badge we gave you at the door. That’s because, at the end of the day, the badges are just PCBs. Short of designing your own enclosure (which has certainly been done), every badge looks the same. That is, until now.
This year’s badge is unique among Supercon badges because it isn’t just a PCB. It’s actually a stack-up of two PCBs! That might not sound like much of a distinction, but in this case, the front board has no electrical function — its only purpose is to hold the keyboard membrane against the dome switches on the rear PCB. The only reason we made it out of a PCB in the first place is that it was convenient and cheap at the scale we needed. But if those weren’t concerns, it could just as easily have been 3D-printed or cut out with a laser or a CNC router.
While the necessities of running two hacker cons on opposite sides of the planet within a couple of months of each other meant we needed to think at scale, attendees are free to do whatever they want between now and when they get their badges on Friday. Want to carve a front panel out of aluminum on your CNC? Awesome. Perhaps laser-cut some thin plywood and give it a nice stain for that old-school look? We love it. Want to see what that fancy multi-material 3D printer you’ve got is capable of? So do we.
Some Assembly Required
Hailing frequencies open, Captain.
Spacing between the rear and front boards should be approximately 2 mm.The area around the keyboard should be roughly PCB thickness (~1.7 mm) for optimal typing.You’ll need to provide hardware (M3 nuts/bolts work well) to attach the front panel to the badge.
Want to make the 2025 Hackaday Supercon badge your own? Just head over to the “hardware/mechanicals_and_models” directory in the badge’s GitHub repository and you’ll find STEP, DXF, and SVG versions of the front panel. We’re eager to see some wild and wonderful front panels, but there are a few things to keep in mind:If you’ve got other questions or need some assistance, leave a comment below or check in on the #badge-hacking channel in the Hackaday Discord server. See you at Supercon!
-
Is the internet today the internet you want for future generations? What if instead of for-profit greed, rampant privacy violations, and pervasive government spying, we could have a different relationship with the internet?
Join us in building a free and open internet – free from the chains of surveillance and censorship! ⛓️💥
https://blog.torproject.org/2025-fundraiser-donations-matched/