
Enable tethered internet access to your Pocket PC PDA using OpenBSD
-
Nostalgia for a more relaxed era of computing can drive one to resurrecting ancient protocols, breathing in solder fumes, and exploring old-new networking technologies on OpenBSD.
0. The Duction of the Intro
0.0 Nostalgia strikes again
Once you get started installing BSD on old junk you cannot seem to be able to stop. The devices get more and more exotic, the hardware hacking gets more and more serious, your soldering skills get better and better, and you find yourself digging through manpages for things that, while they are still somehow in base, nobody has really touched in the last 20 years.
NetBSD is of course the great enabler of this terrible habit, with all the enticing, exotic platforms they support. And because the more I use the fondle-slabs that are today marketed as “telephones” the more I hate the “everything is a touchscreen” intreface design paradigm, and the more I find myself reminiscing about how much nicer life was when Blackberries were still a thing. ¹ Keyboards! Simple operating systems! Insane battery life in comparison to fondle-slabs! Zero telemetry! Resilient (if slow) cellular networking!
In a moment of nostalgia I stumbled upon the various “pocket sized” devices that are supported by NetBSD, ² and I noticed that they could run on certain HP iPaq’s — notably the H3600. The good thing is these are available for cheap on the interwebz, if you are lucky. I first found an iPaq H3700 for sale, for a whopping £19.09 including shipping, together with (slightly worn) leather pouch, USB sync cable, and docking cradle. And because the 3700 is almost identical internally to the 3600, I had high hopes that it may just be compatible, and that I may be able to run NetBSD on it.
But then, as I was browsing for accessories (CF based WiFi cards and the like) on eBay, I also came across a “Genuinely untested” iPaq H3600 that was being sold for £8.99 because the seller could not find a charger. Then with a stroke of luck I also found a spare docking station WITH CF CARD ADAPTER for £12.04. ³ So £21.03 and a few days of waiting later I had ANOTHER PDA, this time one that is 100% guaranteed to be able to boot NetBSD (somehow). I really hope that She Who Must Be Obeyed is not reading this.
The H3600, as I suspected, was absolutely fine. Only the battery was completely dead. They are not that hard to repair, and I will maybe write up a separate note on gemini about how to do it, all you need to do is snip some nickel strips and solder in a new LiPo to the flex PCB that has the proprietary connector on it. I gave it a go first on the H3700 and it worked great, so I quickly ordered some 305590 LiPo batteries, and in the meantime resolved to not remove the H3600 from its USB cradle.
0.1 Lack of connectivity strikes again
What was missing, however, is a means for me to actually get data onto the devices. I did not own any CF Cards somehow (which another eBay purchase corrected, however I am yet to take delivery of them), and so the obvious means would have been to FTP files across. But these devices have no internal ethernet capabilities (newer PDA’s often have ethernet over USB). They speak serial, and they can work with dialup. They were never really intended for “on the go” internet access, really — when I used a PDA during university years I was very happy to sync it at home in the morning and in the evening when I got home, and load things onto it for the day, even though the HX2750 I used to own did have WiFi baked in.
1. Initial (semi-useful, but ultimately futile) Serial over USB attempts
But these ones have no wifi, no ethernet, only IRDA (which I don’t have) and serial. But I thought, if they have serial, I should be able to speak to them via
cuon OpenBSD, right? Well, it turns out, yes and no.I plugged in the PocketPC, and it attached cheerfully:
uipaq0 at uhub0 port 12 configuration 1 interface 0 "Compaq iPAQ PocketPC" rev 1.00/0.00 addr 5
ucom0 at uipaq0, Generic: usb0.0.0000c.0
OpenBSD has an
uipaq(4)driver:DESCRIPTION The uipaq driver provides support for the USB serial emulation provided by the iPAQ devices. The device is accessed through the ucom(4) driver which makes it behave like a tty(4). HARDWARE The uipaq driver supports the following adapters: Alltel UTStarcom PPC6700 Asus MyPal A730 Casio BE300 Compaq IPaq PocketPC HP iPAQ 22xx/Jornada 548 HP Jornada 568 HTC SmartPhoneSo that means that, if my $USER is a member of the
dialergroup, I should be able to dial in via/dev/cuaU0, right? Web searches revealed that the baud rate is usually 115200, so in we jack:$ cu -l /dev/cuaU0 -s115200 -d Connected to /dev/cuaU0 (speed 115200) CLIENTCLIENTCLIENTThis is great! It is connecting! But what ISN’T so great is that it is trying to establish an ActiveSync connection. How do I speak ActiveSync on OpenBSD?! I found one FOSS projects out there which claims to able to do it, but it will run on BSD. ⁴ SynCE was out of the question therefore. Upon a lot of browsing old sites only available via archive.org by now, and digging into the “Install Linux on your PDA” tutorials from ages ago, I discovered that most use
pppdfor connecting to their PDA’s. This seemed like a promising way forward.And while I want to foreshadow that
pppdis indeed the answer, I will at this point spare the reader from describing the days of futile attempts to connect over USB.The gist of the problem can be summarised in these three photos:
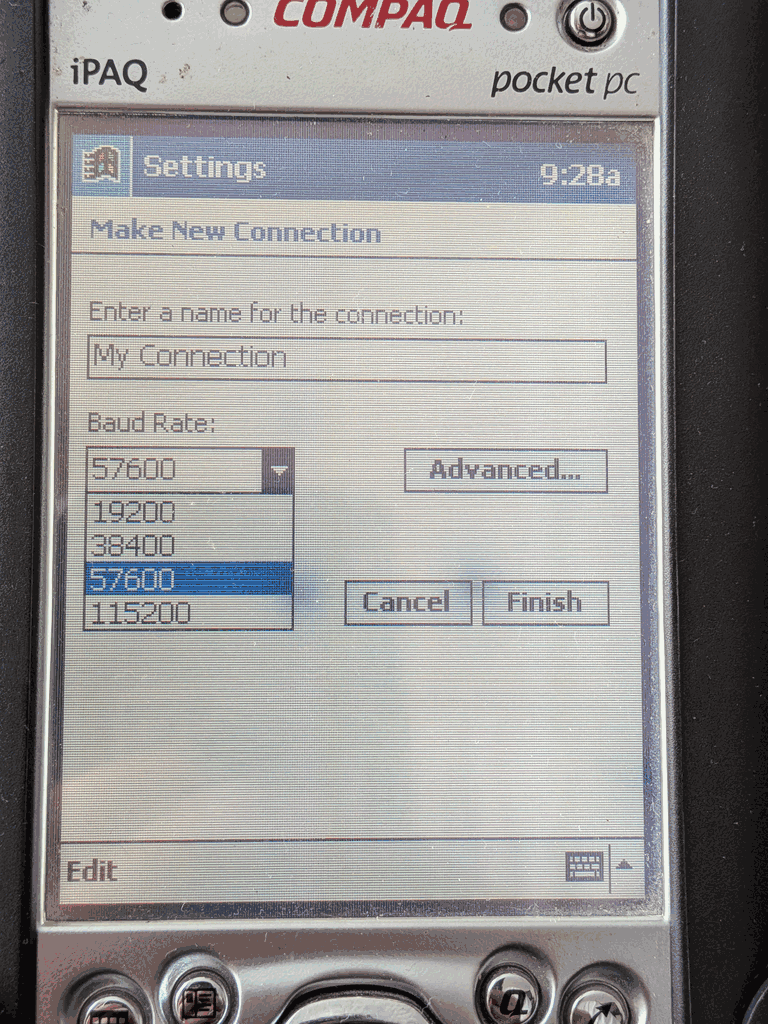
PocketPC 3.0 Settings > Connections 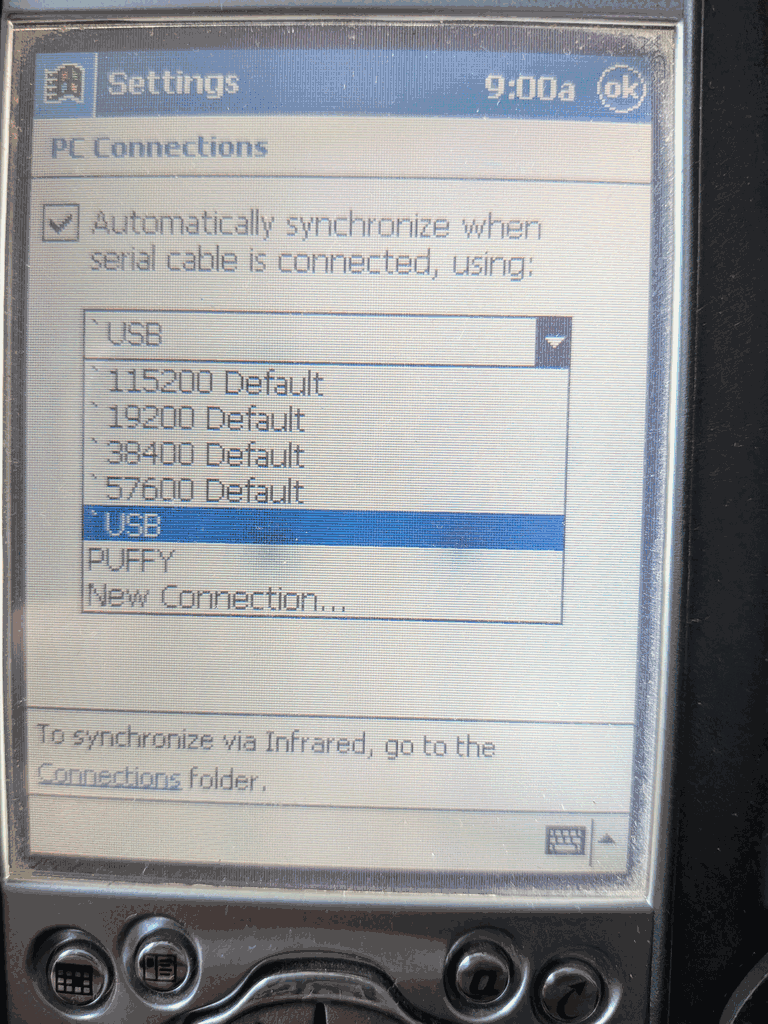
PocketPC 3.0 Settings > Connections > PC 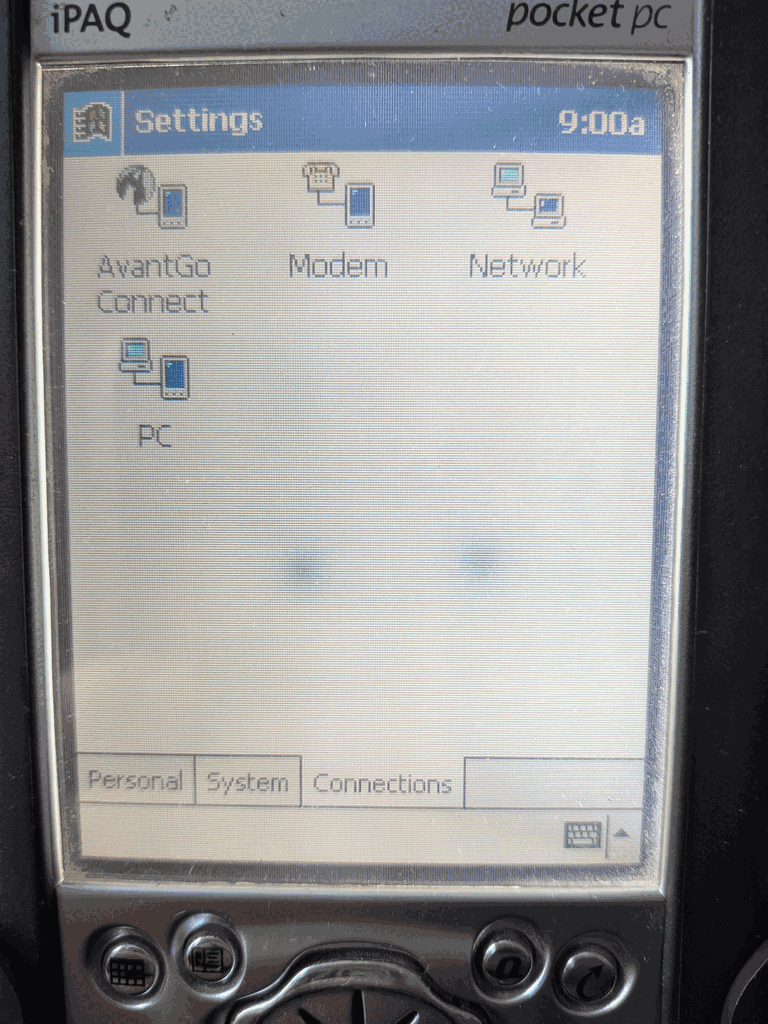
PocketPC 3.0 Settings > Connections > PC > New Connection… The problem here is that “`USB” is suspiciously missing when trying to establish a new tethered internet connection. Baud rates are listed however. The significance of this that, as I discovered the Hard Way, ™️ basically you CANNOT establish a point-to-point internet connection when using the USB cable. You need direct serial.
2. Hand-crafting an RS232 enabled iPaq cradle
RS232-enabled, dual-connector (USB and DB9) cradles do exist for the iPaq H3x000 series, but I didn’t want to spend ANOTHER £19 on eBay.
The good news is that even the “standard” USB cradles come with RS232 inside, it’s just that the headers are not populated. But you can 100% solder a DB9 cable directly to the pads. The pinout was, fortunately, available ifrom Handhelds.org via the Internet Archive. ⁵
When you unscrew the bottom 4 screws of the cradle and carefully take out all the plastic bits (note that there are some springs which like to go PING when you take it apart), you will find that the sync connector PCB is actually very simple, and that on the back you have 14 pads labelled CON2. On my board they were also helpfully numbered.
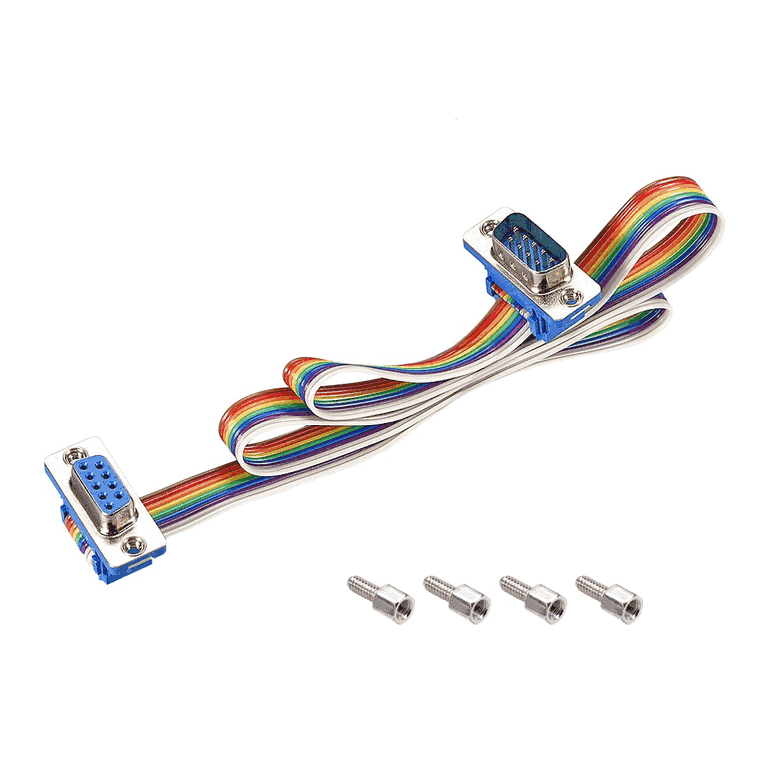
All I needed to do was is to sacrifice on of my DB9 “rainbow ribbon” connectors ⁶ (that’s what I had in hand but you can totally use a “regular” DB9 cable). I went with a female connector as that is what the tutorial also mentioned. Check what sockets your computers / peripherals / cables have, and make a choice.
Reworking the handhelds.org table, the pinout I followed was this
+-------------+---------+--------------------+
| H3600 CON 2 | DB9 Pin | DB9 RS232 Function |
+-------------+---------+--------------------+
|           1 | 6       | DSR                |
|           2 | 7       | RTS                |
|           3 | 8       | CTS                |
|           4 | 2       | RXD                |
|           5 | 3       | TXD                |
|           6 | 1       | DCD                |
|           7 | 4       | DTR                |
|           8 | NC      | -                  |
|           9 | 5+case  | GND                |
+-------------+---------+--------------------+
The rainbox connector I used is wired “up – down – up – down”, so the first ribbon cable is the first in the top row, the second ribbon cable is the first in the bottom row, etc. Reading the numbers on the DB9 connector socket’s inside plastic thing, as well as confirming the readings with a multimeter, I soldered the DB9 ribbon to the 14 pads in the following order:
+---------------------+-------------------+
| Pad on H3600 cradle | DB9 ribbon colour |
+---------------------+-------------------+
|                   1 | Red               |
|                   2 | Yellow            |
|                   3 | Blue              |
|                   4 | Orange            |
|                   5 | Green             |
|                   6 | Brown             |
|                   7 | Purple            |
|                   8 | White             |
+---------------------+-------------------+
Fear not, there is a photo:
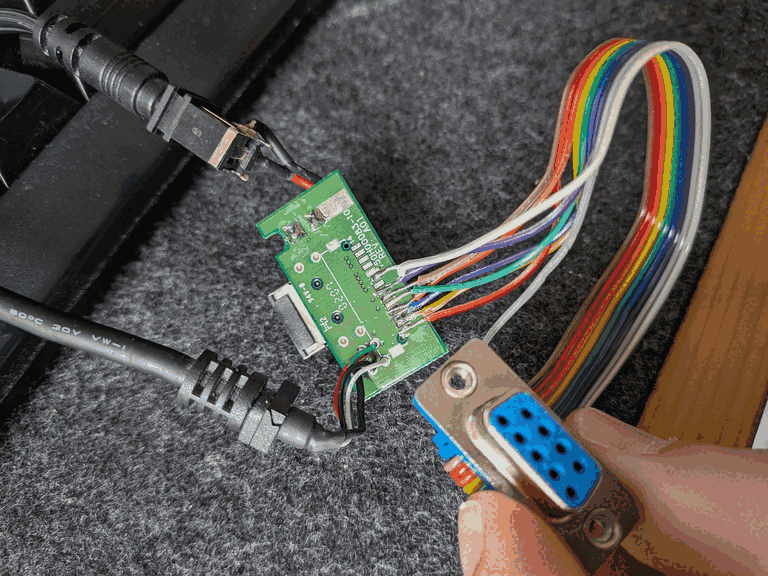
DB9 connector soldered to H3600 Cable COM2 pins. To test my cable I connected the DB9 port, set up a New PC connection over 115200 bauds on the PocketPC called “PUFFY”, opened
cu -l /dev/cua00 -s 115200 -d(note this is NOT cuaU0 for USB) and what I got again was,Connected to /dev/cuaU0 (speed 115200) CLIENTCLIENTCLIENTCLIENTGreat success! The DB9 hack totally worked!
So now we just need to make sure that we can actually get a ppp (point-to-point protocol) connection established over serial.
3. Setting up the tethered ppp connection using
pppd,chatand theppp0interfaceThe
pppdtutorials I found for OpenBSD usually focussed on receiving modem AT commands to establish a dial-in connection. That would be nice but I am not using a Hayes modem this time. I am trying to convince ActiveSync to connect.pppdcan use so-called “chat scripts” where, after a connection comes in, it forks out and runschat, which can read a “chat script”, a file containing some simple “REQUEST ANSWER” directives. Pppd also has a useful feature where it can remember “cleints” in a file, so you can store your connection settings in there.The first thing to get started is to create a
ppp0interface and bring it up.# echo "up" > /etc/hostname.ppp0 # ifconfig ppp0 upThen to configure pppd, you need to create a few files in
/etc/ppp:- A “peer” file in
/etc/ppp/peers - A chat script in
/etc/ppp
I am going to call them “ipaq” and “ipaq.chat”.
So first, the peer file, with some explanation:
# cat /etc/ppp/peers/ipaq /dev/cua00 115200 noauth 10.128.1.101:10.128.1.100 debug connect 'chat -v -f /etc/ppp/ipaq.chat' proxyarp ms-dns 9.9.9.9 ms-dns 149.112.112.112- The first line specifies the port (cua00 is my DB9 port), and the baud rate (115200 bauds is the highest speed available on the PDA).
- The second line, “noauth” specifies that we are not expecting a username and a password
- The third line specifies HOST_IP:CLIENT_IP assignments over the ppp connection. The PDA will be 10.128.1.100, and the OpenBSD desktop will be .101. The IP assignments should be such that they do not confuse your machine. Initially I made the mistake of using 192.168.55.100/101 as the IP addresses, because some tutorials suggested to use these values — they are the hardcoded default IP addresses in ActiveSync. But there is no need to use these, it turns out, however if you do use a 192.168.* address for ppp0, that might really confuse the packet forwarding later.
debugenables more verbose logging to /var/log/messagesconnect 'chat'etc. provides a connection script. When a connection is established, pppd will fork out and runchatwith the provided parameters. We specify -v for verbosity and feed it the chat script in /etc/ppp/ipaq.chat with the -f paramenter.proxyarpis something I added for good luck, often found in tutorials for internet sharing, but I am uncertain this is needed and now I am afraid to remove it- ms-dns lines specify DNS addresses to pass to the PDA. Use Quadnine becuase it rocks.
Then let’s have a look at the chat script
# cat /etc/ppp/ipaq.chat
CLIENT    \dCLIENTSERVER\c
It is one line that we need, really. It could be two, but this is cleaner. Basically all this does is, when the PDA is trying to establish an ActiveSync connection over serial by sending “CLIENT” (as seen above in examples), we should respond with “CLIENT” followed by sending “SERVER”.
This, basically, takes care of the pppd setup.
4. The PDA side and your first working local connection to the desktop
A C H T U N G This is for the H3600, running Windows CE Version 3.0.9348 (Build 9616). Settings may be different for other versoins of Windows CE / PocketPC, or on some models (such as the H3700) these settings may not even exist.- Go into Start > Settings > Connections > PC.
- If disabled, tick in “Automatically synchronize”… to allow you to add a new setting
- From the dropdown, select “New Connection…”
- Enter “PUFFY” (or whatever) as the name, select 115200baud for your Baud Rate (or choose slower, and suffer)
- Tap “Advanced…”
- For Port Settings – Data Bits: 8, Parity: None, Stop Bits: 1, Flow Control: Hardware. Untick all three boxes (terminal / dialing commands). Go the TCP/IP tab.
- For TCP/IP: Choose “Use server-assigned IP address”, make sure “Use slip” is disabled, make sure the two checkboxes for software / IP header compression are on.
- For Name Servers: you can leave it at the default “Use server-assigned addresses”
- Tap “OK” in the top-right corner, then tap on the “Finish” button.
- You can leave the “Automatically synchronize” setting on, or you can disable it, whatever you prefer. If you leave it enabled, the iPaq will connect to your desktop as soon as you connect the RS232 and you open open the ppp connection with
pppd.
Now, connect your PDA to computo, and, as root, initiate a call, and start looking at what happens
# pppd call ipaq && tail -f /var/log/messagesPppd will start listening for incoming connexions.
Then on your iPaq, go to Start > Programs > Connections. You should see your own connection, “PUFFY” come up there. Tap PUFFY, and you should see the the PDA dialling like in the photos below:
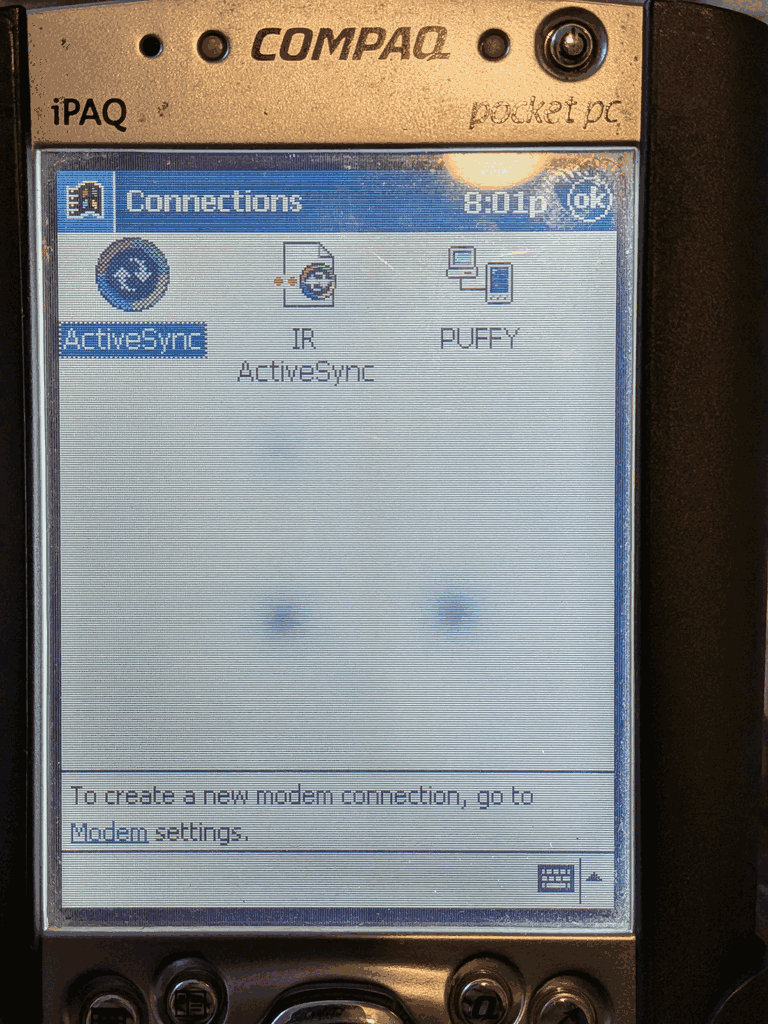
Start > Programs > Connections > Puffy 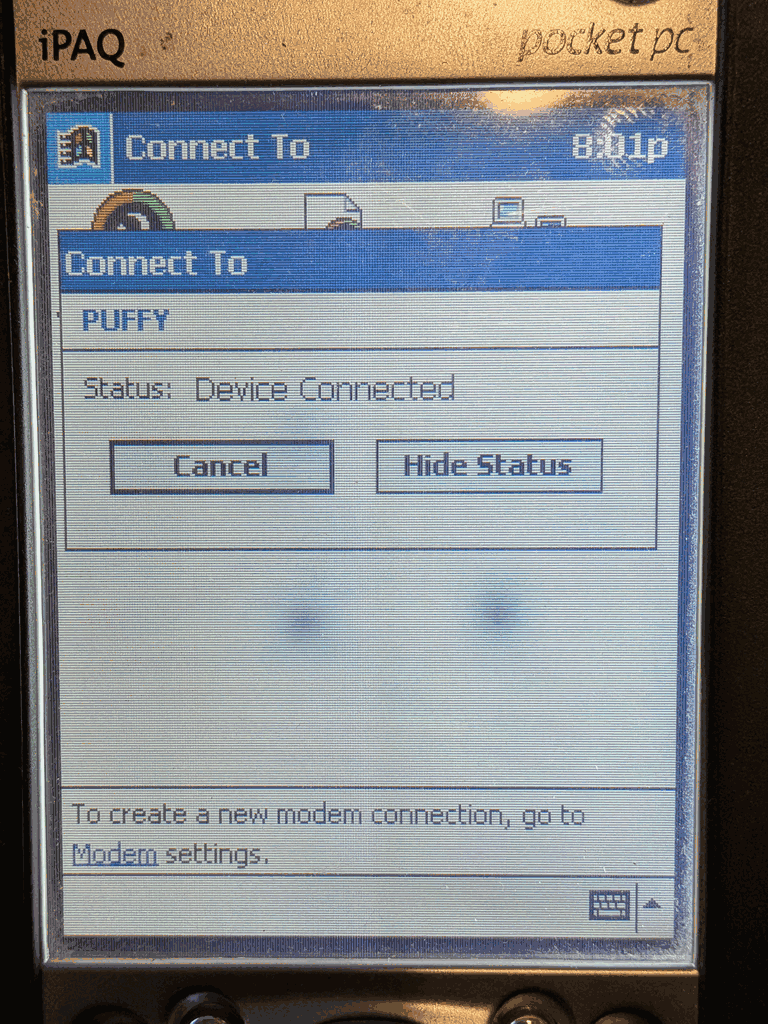
Dialling… 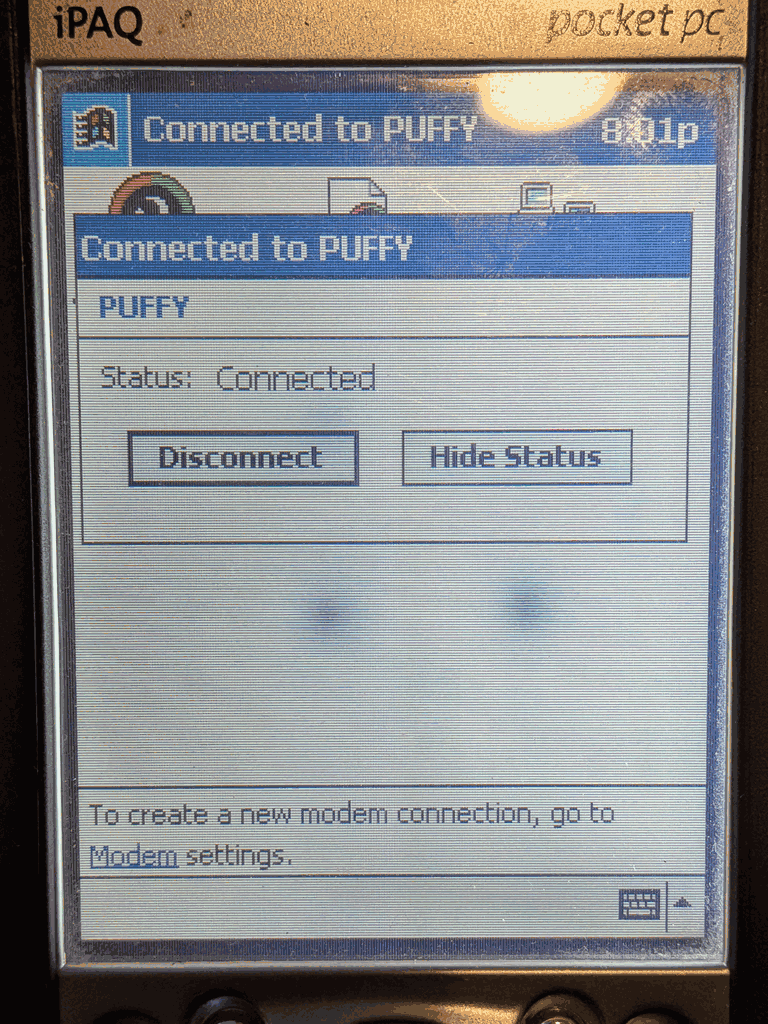
Connected! Meanwhile on the BSD side you should see the following log output:
May 18 16:45:25 l337hax0r pppd[20523]: pppd 2.3.5 started by yoozur, uid 0
May 18 16:45:31 l337hax0r pppd[20523]: Connect: ppp0 <--> /dev/cua00
May 18 16:45:33 l337hax0r pppd[20523]: Cannot determine ethernet address for proxy ARP
May 18 16:45:33 l337hax0r pppd[20523]: local  IP address 10.128.1.101
May 18 16:45:33 l337hax0r pppd[20523]: remote IP address 10.128.1.100
(Hm, so maybe I don’t need ‘proxyarp’ in the peer file?)
I am running a local-only
httpdservice for testing on my desktop, but if you are not, and you need to do some quick testing, installdarkhttpdfrom packages and run$ darkhttpd .in a directory of your choosing. My testing httpd server only shows the output ofsysctl kern.versionto know I am connected to the right machine.So quicky fire up Internet Explorer 3 (!) and head over to your ppp0 IP address, and bask in glory as you load your very first html page over your tethered connection:
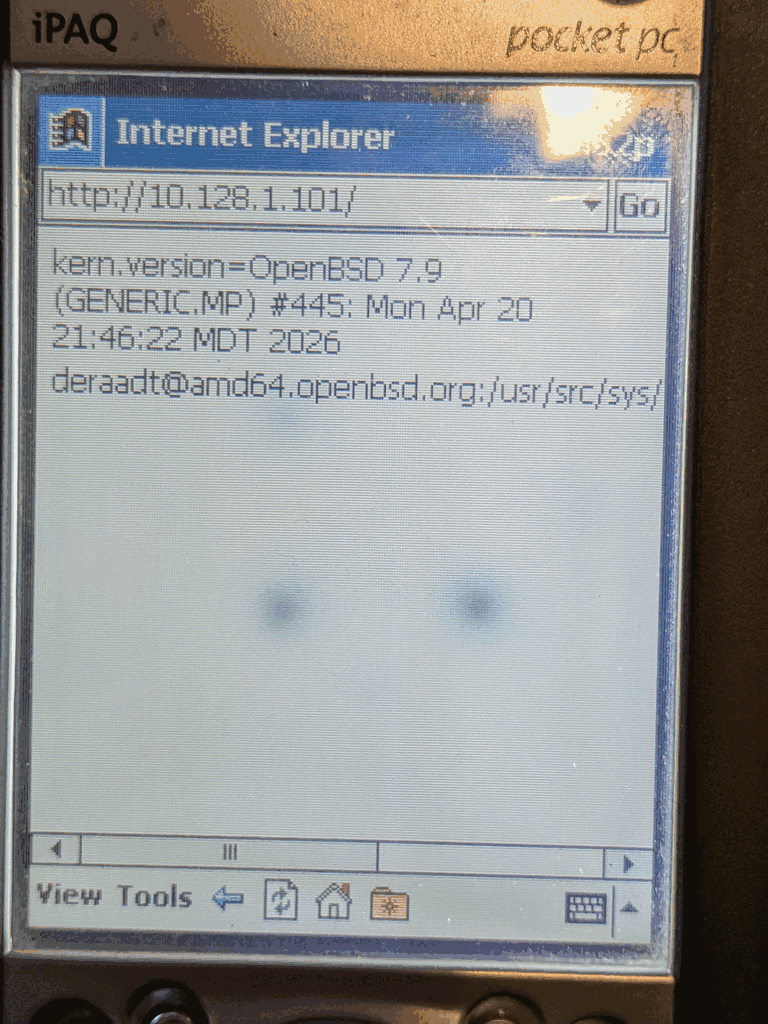
Internet Explorer 3 displaying http://10.128.1.101 Now to crown it all with actual remote connectivity…
5. Setting up ppp0 to em0 internet sharing in pf
You need IP forwarding enabled first via
sysctl.conf. IPV6 is enabled below, but you won’t strictly need it for this setup.# cat /etc/sysctl.conf net.inet.ip.forwarding=1 net.inet6.ip6.forwarding=1Then, in pf.conf, you need to set up two variables, a “match” directive and two “pass” directives. The “pass” directives might not be needed actually, depending on the rest of your configuration.
# cat /etc/pf.conf
### Define these at the top of your config
ext_if = "em0"
ppp_if = "ppp0"

### Define this early on
match out on $ext_if from ($ppp_if:network) to any nat-to ($ext_if)

### Add this anywhere it makes sense, preferably AFTER any blocking rules
#pda
pass out on $ext_if from ($ppp_if:network) to any keep state
pass in on $ppp_if from ($ppp_if:network) to any keep state
Then quickly run a sanity check with
# pfctl -n -f /etc/pf.confAnd if there are no typos, complaints, and causes for concern, then load the pf ruleset:
# pfctl -f /etc/pf.confThen, if you had an active ppp connection going hang it up (simply disconnect using the PDA’s connection icon on the Today panel, or unplug, or zap the pppd process).
Once you re-establish your connection, open Internet Explorer, be exceedingly glad:
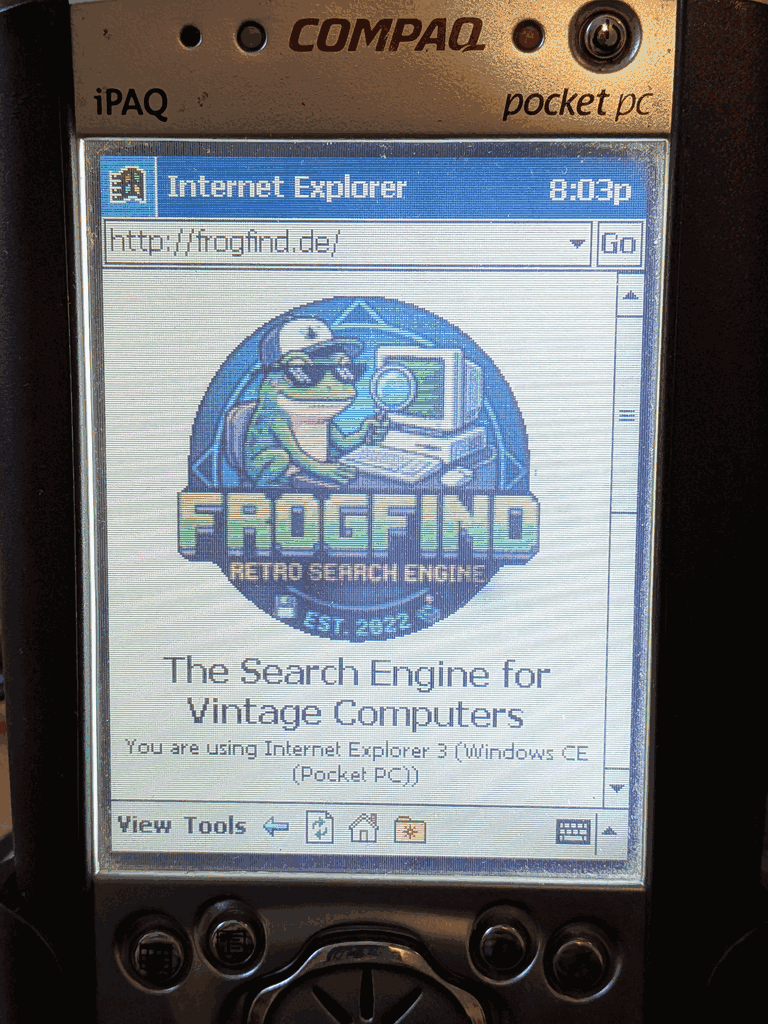
Internet Exploring FROGFIND! Originally publish on Gemini over at gemini://vigilia.cc
¹ I still have my Blackberry 8520, which was my last non-fondleslab phone. I really wish that they were usable again, I really wish somebody did to them what was done to the Pebble watches. I also have a Treo phone here at home somewhere, but it’s locked to Orange, which is now FAR gone…
² NetBSD/hpcarm port. Readers might also be interested in the hpcmips and hpcsh and zaurus ports.
³ The CF card adapter sleds fetch for about £90 on eBay, so I was REALLY lucky with this one.
⁴ Pet hate no. 9287: when projects claim they support “Unix” by which they actually mean “only the latest Ubuntu.” And the codebase is of course a mess.
⁵ Internet Archive for Handhelds.org: Serial Cable Connections for the H3600
⁶ 🖼️ DB9 rainbow ribbon connector (male to female) - A “peer” file in
-
Nostalgia for a more relaxed era of computing can drive one to resurrecting ancient protocols, breathing in solder fumes, and exploring old-new networking technologies on OpenBSD.
0. The Duction of the Intro
0.0 Nostalgia strikes again
Once you get started installing BSD on old junk you cannot seem to be able to stop. The devices get more and more exotic, the hardware hacking gets more and more serious, your soldering skills get better and better, and you find yourself digging through manpages for things that, while they are still somehow in base, nobody has really touched in the last 20 years.
NetBSD is of course the great enabler of this terrible habit, with all the enticing, exotic platforms they support. And because the more I use the fondle-slabs that are today marketed as “telephones” the more I hate the “everything is a touchscreen” intreface design paradigm, and the more I find myself reminiscing about how much nicer life was when Blackberries were still a thing. ¹ Keyboards! Simple operating systems! Insane battery life in comparison to fondle-slabs! Zero telemetry! Resilient (if slow) cellular networking!
In a moment of nostalgia I stumbled upon the various “pocket sized” devices that are supported by NetBSD, ² and I noticed that they could run on certain HP iPaq’s — notably the H3600. The good thing is these are available for cheap on the interwebz, if you are lucky. I first found an iPaq H3700 for sale, for a whopping £19.09 including shipping, together with (slightly worn) leather pouch, USB sync cable, and docking cradle. And because the 3700 is almost identical internally to the 3600, I had high hopes that it may just be compatible, and that I may be able to run NetBSD on it.
But then, as I was browsing for accessories (CF based WiFi cards and the like) on eBay, I also came across a “Genuinely untested” iPaq H3600 that was being sold for £8.99 because the seller could not find a charger. Then with a stroke of luck I also found a spare docking station WITH CF CARD ADAPTER for £12.04. ³ So £21.03 and a few days of waiting later I had ANOTHER PDA, this time one that is 100% guaranteed to be able to boot NetBSD (somehow). I really hope that She Who Must Be Obeyed is not reading this.
The H3600, as I suspected, was absolutely fine. Only the battery was completely dead. They are not that hard to repair, and I will maybe write up a separate note on gemini about how to do it, all you need to do is snip some nickel strips and solder in a new LiPo to the flex PCB that has the proprietary connector on it. I gave it a go first on the H3700 and it worked great, so I quickly ordered some 305590 LiPo batteries, and in the meantime resolved to not remove the H3600 from its USB cradle.
0.1 Lack of connectivity strikes again
What was missing, however, is a means for me to actually get data onto the devices. I did not own any CF Cards somehow (which another eBay purchase corrected, however I am yet to take delivery of them), and so the obvious means would have been to FTP files across. But these devices have no internal ethernet capabilities (newer PDA’s often have ethernet over USB). They speak serial, and they can work with dialup. They were never really intended for “on the go” internet access, really — when I used a PDA during university years I was very happy to sync it at home in the morning and in the evening when I got home, and load things onto it for the day, even though the HX2750 I used to own did have WiFi baked in.
1. Initial (semi-useful, but ultimately futile) Serial over USB attempts
But these ones have no wifi, no ethernet, only IRDA (which I don’t have) and serial. But I thought, if they have serial, I should be able to speak to them via
cuon OpenBSD, right? Well, it turns out, yes and no.I plugged in the PocketPC, and it attached cheerfully:
uipaq0 at uhub0 port 12 configuration 1 interface 0 "Compaq iPAQ PocketPC" rev 1.00/0.00 addr 5
ucom0 at uipaq0, Generic: usb0.0.0000c.0
OpenBSD has an
uipaq(4)driver:DESCRIPTION The uipaq driver provides support for the USB serial emulation provided by the iPAQ devices. The device is accessed through the ucom(4) driver which makes it behave like a tty(4). HARDWARE The uipaq driver supports the following adapters: Alltel UTStarcom PPC6700 Asus MyPal A730 Casio BE300 Compaq IPaq PocketPC HP iPAQ 22xx/Jornada 548 HP Jornada 568 HTC SmartPhoneSo that means that, if my $USER is a member of the
dialergroup, I should be able to dial in via/dev/cuaU0, right? Web searches revealed that the baud rate is usually 115200, so in we jack:$ cu -l /dev/cuaU0 -s115200 -d Connected to /dev/cuaU0 (speed 115200) CLIENTCLIENTCLIENTThis is great! It is connecting! But what ISN’T so great is that it is trying to establish an ActiveSync connection. How do I speak ActiveSync on OpenBSD?! I found one FOSS projects out there which claims to able to do it, but it will run on BSD. ⁴ SynCE was out of the question therefore. Upon a lot of browsing old sites only available via archive.org by now, and digging into the “Install Linux on your PDA” tutorials from ages ago, I discovered that most use
pppdfor connecting to their PDA’s. This seemed like a promising way forward.And while I want to foreshadow that
pppdis indeed the answer, I will at this point spare the reader from describing the days of futile attempts to connect over USB.The gist of the problem can be summarised in these three photos:
PocketPC 3.0 Settings > Connections PocketPC 3.0 Settings > Connections > PC PocketPC 3.0 Settings > Connections > PC > New Connection… The problem here is that “`USB” is suspiciously missing when trying to establish a new tethered internet connection. Baud rates are listed however. The significance of this that, as I discovered the Hard Way, ™️ basically you CANNOT establish a point-to-point internet connection when using the USB cable. You need direct serial.
2. Hand-crafting an RS232 enabled iPaq cradle
RS232-enabled, dual-connector (USB and DB9) cradles do exist for the iPaq H3x000 series, but I didn’t want to spend ANOTHER £19 on eBay.
The good news is that even the “standard” USB cradles come with RS232 inside, it’s just that the headers are not populated. But you can 100% solder a DB9 cable directly to the pads. The pinout was, fortunately, available ifrom Handhelds.org via the Internet Archive. ⁵
When you unscrew the bottom 4 screws of the cradle and carefully take out all the plastic bits (note that there are some springs which like to go PING when you take it apart), you will find that the sync connector PCB is actually very simple, and that on the back you have 14 pads labelled CON2. On my board they were also helpfully numbered.
All I needed to do was is to sacrifice on of my DB9 “rainbow ribbon” connectors ⁶ (that’s what I had in hand but you can totally use a “regular” DB9 cable). I went with a female connector as that is what the tutorial also mentioned. Check what sockets your computers / peripherals / cables have, and make a choice.
Reworking the handhelds.org table, the pinout I followed was this
+-------------+---------+--------------------+
| H3600 CON 2 | DB9 Pin | DB9 RS232 Function |
+-------------+---------+--------------------+
|           1 | 6       | DSR                |
|           2 | 7       | RTS                |
|           3 | 8       | CTS                |
|           4 | 2       | RXD                |
|           5 | 3       | TXD                |
|           6 | 1       | DCD                |
|           7 | 4       | DTR                |
|           8 | NC      | -                  |
|           9 | 5+case  | GND                |
+-------------+---------+--------------------+
The rainbox connector I used is wired “up – down – up – down”, so the first ribbon cable is the first in the top row, the second ribbon cable is the first in the bottom row, etc. Reading the numbers on the DB9 connector socket’s inside plastic thing, as well as confirming the readings with a multimeter, I soldered the DB9 ribbon to the 14 pads in the following order:
+---------------------+-------------------+
| Pad on H3600 cradle | DB9 ribbon colour |
+---------------------+-------------------+
|                   1 | Red               |
|                   2 | Yellow            |
|                   3 | Blue              |
|                   4 | Orange            |
|                   5 | Green             |
|                   6 | Brown             |
|                   7 | Purple            |
|                   8 | White             |
+---------------------+-------------------+
Fear not, there is a photo:
DB9 connector soldered to H3600 Cable COM2 pins. To test my cable I connected the DB9 port, set up a New PC connection over 115200 bauds on the PocketPC called “PUFFY”, opened
cu -l /dev/cua00 -s 115200 -d(note this is NOT cuaU0 for USB) and what I got again was,Connected to /dev/cuaU0 (speed 115200) CLIENTCLIENTCLIENTCLIENTGreat success! The DB9 hack totally worked!
So now we just need to make sure that we can actually get a ppp (point-to-point protocol) connection established over serial.
3. Setting up the tethered ppp connection using
pppd,chatand theppp0interfaceThe
pppdtutorials I found for OpenBSD usually focussed on receiving modem AT commands to establish a dial-in connection. That would be nice but I am not using a Hayes modem this time. I am trying to convince ActiveSync to connect.pppdcan use so-called “chat scripts” where, after a connection comes in, it forks out and runschat, which can read a “chat script”, a file containing some simple “REQUEST ANSWER” directives. Pppd also has a useful feature where it can remember “cleints” in a file, so you can store your connection settings in there.The first thing to get started is to create a
ppp0interface and bring it up.# echo "up" > /etc/hostname.ppp0 # ifconfig ppp0 upThen to configure pppd, you need to create a few files in
/etc/ppp:- A “peer” file in
/etc/ppp/peers - A chat script in
/etc/ppp
I am going to call them “ipaq” and “ipaq.chat”.
So first, the peer file, with some explanation:
# cat /etc/ppp/peers/ipaq /dev/cua00 115200 noauth 10.128.1.101:10.128.1.100 debug connect 'chat -v -f /etc/ppp/ipaq.chat' proxyarp ms-dns 9.9.9.9 ms-dns 149.112.112.112- The first line specifies the port (cua00 is my DB9 port), and the baud rate (115200 bauds is the highest speed available on the PDA).
- The second line, “noauth” specifies that we are not expecting a username and a password
- The third line specifies HOST_IP:CLIENT_IP assignments over the ppp connection. The PDA will be 10.128.1.100, and the OpenBSD desktop will be .101. The IP assignments should be such that they do not confuse your machine. Initially I made the mistake of using 192.168.55.100/101 as the IP addresses, because some tutorials suggested to use these values — they are the hardcoded default IP addresses in ActiveSync. But there is no need to use these, it turns out, however if you do use a 192.168.* address for ppp0, that might really confuse the packet forwarding later.
debugenables more verbose logging to /var/log/messagesconnect 'chat'etc. provides a connection script. When a connection is established, pppd will fork out and runchatwith the provided parameters. We specify -v for verbosity and feed it the chat script in /etc/ppp/ipaq.chat with the -f paramenter.proxyarpis something I added for good luck, often found in tutorials for internet sharing, but I am uncertain this is needed and now I am afraid to remove it- ms-dns lines specify DNS addresses to pass to the PDA. Use Quadnine becuase it rocks.
Then let’s have a look at the chat script
# cat /etc/ppp/ipaq.chat
CLIENT    \dCLIENTSERVER\c
It is one line that we need, really. It could be two, but this is cleaner. Basically all this does is, when the PDA is trying to establish an ActiveSync connection over serial by sending “CLIENT” (as seen above in examples), we should respond with “CLIENT” followed by sending “SERVER”.
This, basically, takes care of the pppd setup.
4. The PDA side and your first working local connection to the desktop
A C H T U N G This is for the H3600, running Windows CE Version 3.0.9348 (Build 9616). Settings may be different for other versoins of Windows CE / PocketPC, or on some models (such as the H3700) these settings may not even exist.- Go into Start > Settings > Connections > PC.
- If disabled, tick in “Automatically synchronize”… to allow you to add a new setting
- From the dropdown, select “New Connection…”
- Enter “PUFFY” (or whatever) as the name, select 115200baud for your Baud Rate (or choose slower, and suffer)
- Tap “Advanced…”
- For Port Settings – Data Bits: 8, Parity: None, Stop Bits: 1, Flow Control: Hardware. Untick all three boxes (terminal / dialing commands). Go the TCP/IP tab.
- For TCP/IP: Choose “Use server-assigned IP address”, make sure “Use slip” is disabled, make sure the two checkboxes for software / IP header compression are on.
- For Name Servers: you can leave it at the default “Use server-assigned addresses”
- Tap “OK” in the top-right corner, then tap on the “Finish” button.
- You can leave the “Automatically synchronize” setting on, or you can disable it, whatever you prefer. If you leave it enabled, the iPaq will connect to your desktop as soon as you connect the RS232 and you open open the ppp connection with
pppd.
Now, connect your PDA to computo, and, as root, initiate a call, and start looking at what happens
# pppd call ipaq && tail -f /var/log/messagesPppd will start listening for incoming connexions.
Then on your iPaq, go to Start > Programs > Connections. You should see your own connection, “PUFFY” come up there. Tap PUFFY, and you should see the the PDA dialling like in the photos below:
Start > Programs > Connections > Puffy Dialling… Connected! Meanwhile on the BSD side you should see the following log output:
May 18 16:45:25 l337hax0r pppd[20523]: pppd 2.3.5 started by yoozur, uid 0
May 18 16:45:31 l337hax0r pppd[20523]: Connect: ppp0 <--> /dev/cua00
May 18 16:45:33 l337hax0r pppd[20523]: Cannot determine ethernet address for proxy ARP
May 18 16:45:33 l337hax0r pppd[20523]: local  IP address 10.128.1.101
May 18 16:45:33 l337hax0r pppd[20523]: remote IP address 10.128.1.100
(Hm, so maybe I don’t need ‘proxyarp’ in the peer file?)
I am running a local-only
httpdservice for testing on my desktop, but if you are not, and you need to do some quick testing, installdarkhttpdfrom packages and run$ darkhttpd .in a directory of your choosing. My testing httpd server only shows the output ofsysctl kern.versionto know I am connected to the right machine.So quicky fire up Internet Explorer 3 (!) and head over to your ppp0 IP address, and bask in glory as you load your very first html page over your tethered connection:
Internet Explorer 3 displaying http://10.128.1.101 Now to crown it all with actual remote connectivity…
5. Setting up ppp0 to em0 internet sharing in pf
You need IP forwarding enabled first via
sysctl.conf. IPV6 is enabled below, but you won’t strictly need it for this setup.# cat /etc/sysctl.conf net.inet.ip.forwarding=1 net.inet6.ip6.forwarding=1Then, in pf.conf, you need to set up two variables, a “match” directive and two “pass” directives. The “pass” directives might not be needed actually, depending on the rest of your configuration.
# cat /etc/pf.conf
### Define these at the top of your config
ext_if = "em0"
ppp_if = "ppp0"

### Define this early on
match out on $ext_if from ($ppp_if:network) to any nat-to ($ext_if)

### Add this anywhere it makes sense, preferably AFTER any blocking rules
#pda
pass out on $ext_if from ($ppp_if:network) to any keep state
pass in on $ppp_if from ($ppp_if:network) to any keep state
Then quickly run a sanity check with
# pfctl -n -f /etc/pf.confAnd if there are no typos, complaints, and causes for concern, then load the pf ruleset:
# pfctl -f /etc/pf.confThen, if you had an active ppp connection going hang it up (simply disconnect using the PDA’s connection icon on the Today panel, or unplug, or zap the pppd process).
Once you re-establish your connection, open Internet Explorer, be exceedingly glad:
Internet Exploring FROGFIND! Originally publish on Gemini over at gemini://vigilia.cc
¹ I still have my Blackberry 8520, which was my last non-fondleslab phone. I really wish that they were usable again, I really wish somebody did to them what was done to the Pebble watches. I also have a Treo phone here at home somewhere, but it’s locked to Orange, which is now FAR gone…
² NetBSD/hpcarm port. Readers might also be interested in the hpcmips and hpcsh and zaurus ports.
³ The CF card adapter sleds fetch for about £90 on eBay, so I was REALLY lucky with this one.
⁴ Pet hate no. 9287: when projects claim they support “Unix” by which they actually mean “only the latest Ubuntu.” And the codebase is of course a mess.
⁵ Internet Archive for Handhelds.org: Serial Cable Connections for the H3600
⁶ 🖼️ DB9 rainbow ribbon connector (male to female)
@rqm@journal.bsd.cafe congrats @rqm
- A “peer” file in
-
 stefano@mastodon.bsd.cafe ha condiviso questa discussione su

Ciao! Sembra che tu sia interessato a questa conversazione, ma non hai ancora un account.
Stanco di dover scorrere gli stessi post a ogni visita? Quando registri un account, tornerai sempre esattamente dove eri rimasto e potrai scegliere di essere avvisato delle nuove risposte (tramite email o notifica push). Potrai anche salvare segnalibri e votare i post per mostrare il tuo apprezzamento agli altri membri della comunità.
Con il tuo contributo, questo post potrebbe essere ancora migliore 💗
Registrati Accedi