I'm making a coffee table as part of my woodworking training !
Uncategorized
10
Posts
1
Posters
36
Views
-
I'm making a coffee table as part of my woodworking training ! This is decent-quality ash. I'll post a few days worth of work because I only got the energy/time/will to do it now. This picture is the current state after today: only a drawer and the tabletop is missing, along with some finition and detailing.
PS: I may not have time to complete the thread in one go :)
Edit: to let people know that I'm done posting for today if you want to check out the full thread :)
First, here's the schematic, a big paper sheet for a representation to scale, 1:1. That's super useful to put a piece on it and trace off it, or check how close/far we are from what was planned.
-
First, here's the schematic, a big paper sheet for a representation to scale, 1:1. That's super useful to put a piece on it and trace off it, or check how close/far we are from what was planned.
(I'll try to say how much time it took me to do each step, though be aware I'm not a professional yet, I'm still quite a bit slower) The schematic above is roughly 1 full day of work.
The first pieces I actually made were the feet. Those come from a thicker (57mm) piece of wood I already had available. The rest of the wood arrived later.
First I traced everything I needed using the schematic, then I had a bunch of mortices and such to do. The little square carvings are for added support of the transverses that will eventually go there.
This took almost a full day, digging out mortices takes an awfully long time !
-
(I'll try to say how much time it took me to do each step, though be aware I'm not a professional yet, I'm still quite a bit slower) The schematic above is roughly 1 full day of work.
The first pieces I actually made were the feet. Those come from a thicker (57mm) piece of wood I already had available. The rest of the wood arrived later.
First I traced everything I needed using the schematic, then I had a bunch of mortices and such to do. The little square carvings are for added support of the transverses that will eventually go there.
This took almost a full day, digging out mortices takes an awfully long time !
Then, day 3, beginning work on the actual body. This is the two front and back faces, drawer face (left, barelt visible in the back), and side face. I made sure to cut them from the same board so the grain wraps nicely all around.
With the sawing of the pieces and planing, that's a full day of work.
-
Then, day 3, beginning work on the actual body. This is the two front and back faces, drawer face (left, barelt visible in the back), and side face. I made sure to cut them from the same board so the grain wraps nicely all around.
With the sawing of the pieces and planing, that's a full day of work.
Day 4, we start building the inner frame. I assembled the four sides (so including the drawer face) with the four feet to check everything fits snug and square. It's standing on the uncut feet's top, because it's less cumbersome and that's part of why I didn't cut them yet.Then I laid out the inner frame, deciding and marking where each piece goes. Then comes the time to carve the joinery that will actually hold the the shape of the table: the two left and one right transverses. This was actually pretty challenging to do, because they have to be the exact same length, without any reliable reference on the table yet. So I have to reproduce perfectly from the schematic 3 times. I actually did not use the schematic that much and used a combination of markings and transfers the dimension of a single "reference" transverse. Then checking they're identical, and going back with the chisel or planer, and repeat. Getting that right took half a day.
After that, I machined grooves in almost all pieces for the boards that will go abive and below the drawer, and the bottom of the storage space (to be continued in next post).
-
Day 4, we start building the inner frame. I assembled the four sides (so including the drawer face) with the four feet to check everything fits snug and square. It's standing on the uncut feet's top, because it's less cumbersome and that's part of why I didn't cut them yet.Then I laid out the inner frame, deciding and marking where each piece goes. Then comes the time to carve the joinery that will actually hold the the shape of the table: the two left and one right transverses. This was actually pretty challenging to do, because they have to be the exact same length, without any reliable reference on the table yet. So I have to reproduce perfectly from the schematic 3 times. I actually did not use the schematic that much and used a combination of markings and transfers the dimension of a single "reference" transverse. Then checking they're identical, and going back with the chisel or planer, and repeat. Getting that right took half a day.
After that, I machined grooves in almost all pieces for the boards that will go abive and below the drawer, and the bottom of the storage space (to be continued in next post).
The second half of the 4th day was machining the grooves I already showed on the left and right transverses, and making the lower drawer runners, and some prep work for the next steps at the end of the day.
The grooves were pretty easy: Setup the cutting bits to make an 8mm wide, 10mm deep cut, centered on the 22mm thickness the pieces. That process actually took longer than cutting, which is always a bit... frustrating ?
Anyway, then I made small tenons on one side of both lower runners to go inside the groove of a lower side transverse. Once that's done, I thighten the pre-assembled table again to get the runner's length exactly right and trace it. Making the opposite tenon is pretty easy with a table saw by just using the tray's shims on the first one.
The lower runner span the full width of the table, so that it also makes the side of the storage space at the bottom.I still had a bit of time before the end of the day, so I prepared the assembly of the middle transverses.
-
The second half of the 4th day was machining the grooves I already showed on the left and right transverses, and making the lower drawer runners, and some prep work for the next steps at the end of the day.
The grooves were pretty easy: Setup the cutting bits to make an 8mm wide, 10mm deep cut, centered on the 22mm thickness the pieces. That process actually took longer than cutting, which is always a bit... frustrating ?
Anyway, then I made small tenons on one side of both lower runners to go inside the groove of a lower side transverse. Once that's done, I thighten the pre-assembled table again to get the runner's length exactly right and trace it. Making the opposite tenon is pretty easy with a table saw by just using the tray's shims on the first one.
The lower runner span the full width of the table, so that it also makes the side of the storage space at the bottom.I still had a bit of time before the end of the day, so I prepared the assembly of the middle transverses.
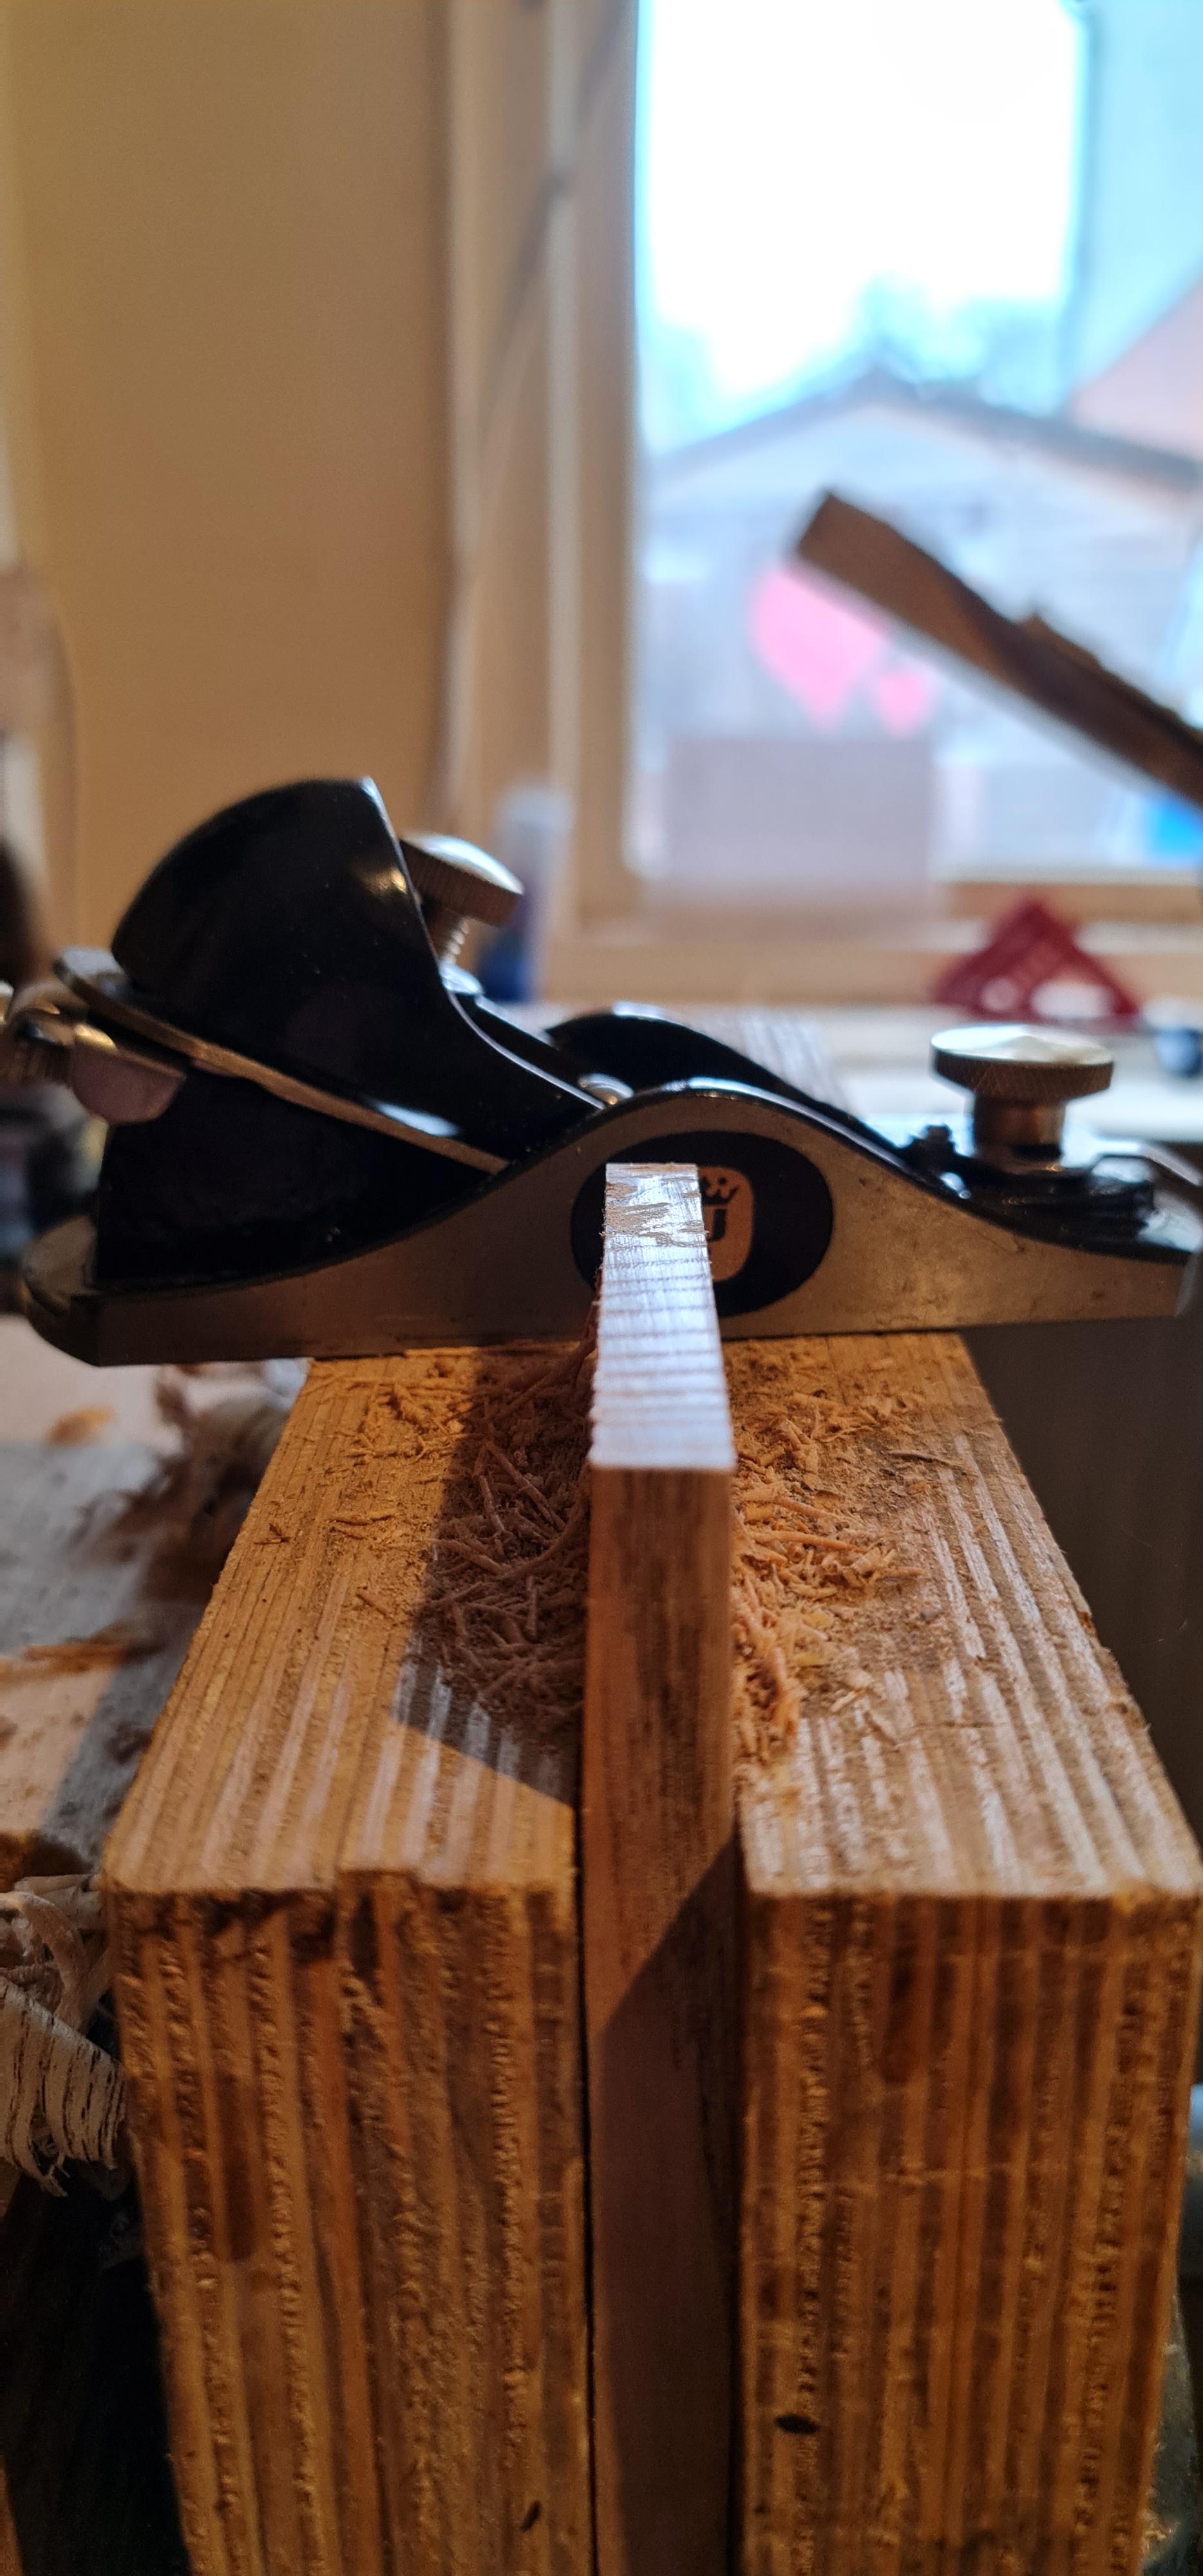
Day 5 ! I start with the small tenons of the lower middle transverse, which I already traced last time. This time I took picture of the process to manually cut the first tenon: first the two cross-cuts at the base, then the rip-cuts for the cheeks. For each cut, I chisel a groove to guide the first strokes of the saw, and get a very precise alignment: I carve straight on the marking, the clear off a small chip on the side that will get sawed off. I can then rest the blade on the vertical wall of the small groove and let the saw dig straight down. If I don't mess anything, I have a perfect cut ! And more accurate that I could with a table or miter saw (a shaper would be as accurate, but not more really and takes ages to setup especially in the context of a classroom).
-
Day 5 ! I start with the small tenons of the lower middle transverse, which I already traced last time. This time I took picture of the process to manually cut the first tenon: first the two cross-cuts at the base, then the rip-cuts for the cheeks. For each cut, I chisel a groove to guide the first strokes of the saw, and get a very precise alignment: I carve straight on the marking, the clear off a small chip on the side that will get sawed off. I can then rest the blade on the vertical wall of the small groove and let the saw dig straight down. If I don't mess anything, I have a perfect cut ! And more accurate that I could with a table or miter saw (a shaper would be as accurate, but not more really and takes ages to setup especially in the context of a classroom).
Then, still before noon, I made the upper drawer runners. This time I made the tenons on table saw to try something different. It's definitely faster, but I'm less accurate so I have more cleanup to do.
-
Then, still before noon, I made the upper drawer runners. This time I made the tenons on table saw to try something different. It's definitely faster, but I'm less accurate so I have more cleanup to do.
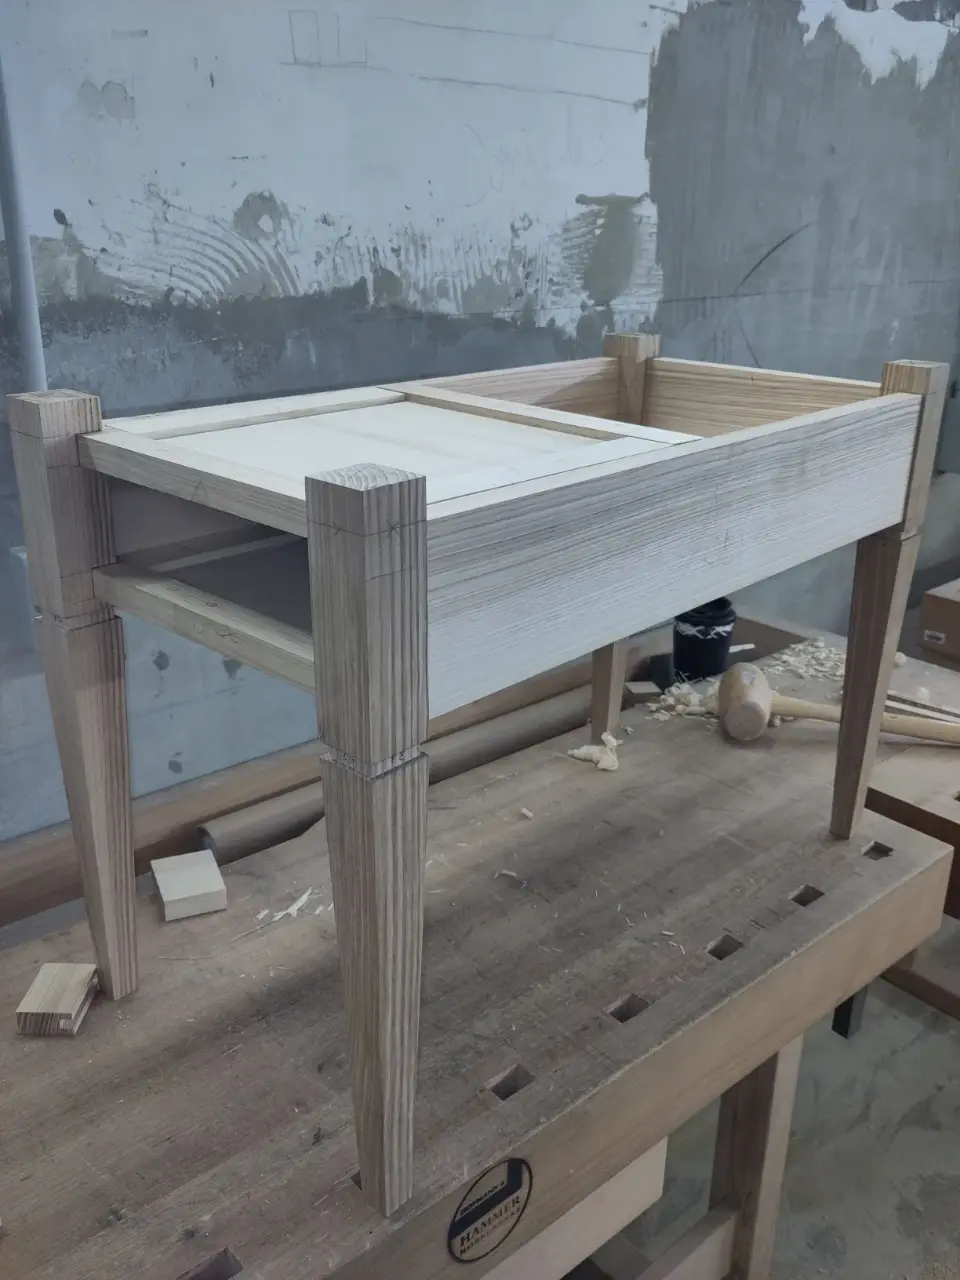
Then it was domino time ! I tried to make them tight but I messed up a bit, I'm not used to this machine yet. But that's alright. Now I can fully assemble the table with its inner frame, clamp everything down, and fiddle a bit to make sure everything is square. And with that it's lunch time.
-
Then it was domino time ! I tried to make them tight but I messed up a bit, I'm not used to this machine yet. But that's alright. Now I can fully assemble the table with its inner frame, clamp everything down, and fiddle a bit to make sure everything is square. And with that it's lunch time.
After lunch, I finished correcting squareness, checking if I had to chisel out some bits here and there or if I would be able to get everything right by tightening only. Thankfully, no more carving was required, at least not yet ! Then I grabbed some birch 8mm plywood board and cut them to size on the table saw. I had to change the blade, so I took a picture of the setting.
After the boards where cut, I realized my machined grooves were barely too small everywhere. So I carefully took some thickness off the sides of each board with a planer. It's stressfull to do it just enough so it's a tight fit without making it too visible, but I'm very pleased to be good at sharpening my tools: it was a breeze on those birch plywood. It did took more time than I would have liked.And with that I could assemble the whole table body ! And that's where I'm at now. That's the end day 5, which was today, I'll add to this thread when I have more progress to show !
Feel free to ask questions about anything ! I'd be pleased to answer and talk.
-
 undefined oblomov@sociale.network shared this topic on
Gli ultimi otto messaggi ricevuti dalla Federazione
-
'Highest' implies more than one bidder and the luxury to be able to choose. I would replace with 'first'.
-
@OpenSoul @gaetanov62 a la peggio, ce semo guadagniati i voti de i benzinai 🤔
-
@thornsinnercircle @Fbrzvnrnd da Napster?
-
@bethroots ok, time for round two, haha :) they *seem* to be converting well now on my end, or at least i hope so 🤞
https://git.lashman.live/lashman/typogenie/releases/tag/v1.2.1
-
Daje
Vado a bere il caffè
#parle
Par🇮🇹le n°1539 X/6🟨🟨⬛⬛⬛
⬛🟨🟩⬛⬛
⬛🟩🟩⬛🟩
🟩🟩🟩⬛🟩
🟩🟩🟩⬛🟩
🟩🟩🟩⬛🟩
-
@mau
♾️ ovvio
@matematica
-
«Dal governo disprezzo per la Carta» | il manifesto
https://ilmanifesto.it/dal-governo-disprezzo-per-la-carta
> Giustizia (Commenti) Basterebbe partire dallo slogan di Fratelli d’Italia per convincersi che le persone detenute dovrebbero votare No al referendum del 22 e 23 marzo. «Vota Sì per una giustizia più efficace, veloce, giusta», detto da chi ha contribuito negli ultimi anni a riempire i tribunali di fascicoli aperti a seguito dell’introduzione di nuovi reati, concorrendo quindi
-
Dai che torniamo giovani:
"Cydia forbAndroid" - perché no?Android, Google chiarisce le regole per il nuovo sideloading e gli sviluppatori certificati - Zeus News
https://www.zeusnews.it/n.php?c=31928